 |
| Easy Flower tutorial |
Hi friends a special
Thank you to all my friends who have been dropping in and writing such sweet comments on the Pen Stand posts...I know it might be getting monotonous but still you are so kind to leave lovely comments!
 |
| Paper Flower tutorial |
This recycled tin can pen stand has a blue color scheme . I used a DCWV paper as the background and added rhinestone borders , a lacy blue ribbon and my favorite Memory Box Spring Border die cut.
 |
| Glitter Foam Butterfly |
The blue butterfly was cut from glitter foam and the gorgeous white butterfly in the photo below is very special to me as it was part of my giveaway win from the supremely talented
Pamelia! Pamelia, your butterfly has found a good home renovation as this Pen Stand was gifted to my daughter's teacher as a Teachers Day Gift!
 |
| Butterfly |
These are all the yummy goodies Pamelia sent me all the way from Canada. Thank you so much Pamelia!!I feel like hoarding everything!
 |
| From Pamelia |
Now on to the Flower Making Tutorial and Tips:
If you have been following my blog you will know I love making flowers! Making handmade flowers usually takes time but knowing a few tricks can help speed up the process when you are in a hurry as I was here!
 |
| Paper Flowers |
How to make Quick and Easy Handmade Paper Flowers
Materials
Paper : I have often seen new crafters ask "what type of paper should be used to make flowers" ---the simplest answer to this is any type! Using different types of paper will give you different looks and for some flowers some papers look better! The key is EXPERIMENT !
For this easy fluffy flower I was looking at the easiest and quickest technique and hence considered the pliability and flexibility factor while choosing the papers.
Let me try and explain :
For the Outer petals : I used thick Ivory Card [ available at local stationary stores as huge sheets] to die cut the outer layer of flowers since I wanted the outer layers to hold the shape and remain stiff with just a little embossing [ time saver!] .
If my flower making was going to involve a lot of embossing and texturing I wouldn't choose the super thick ivory card but choose a paper of average thickness like normal card stock or even regular chart paper [You can see examples of both these papers in the
Handmade Flower tutorials page]
For the Center : Since I was making my center a fringed flower [ I used the memory box fringe border die] I needed a paper which was pliable and easy to bend so I choose thin handmade paper.
If however I was going to hand-cut the fringed paper I would have used a paper which is easier to cut [ handmade paper has a lot of fiber and is not the quickest or easiest paper to fringe]
Adhesive : If you want to quickly make flowers the most obvious adhesive choice would be the glue gun but there are 2 things which you have to keep in mind while opting for the glue gun
1. Hot gluing can leave unsightly glue strings which are a pain to pick out especially when you are in a hurry!
2. Hot gluing thin paper especially on steps requiring you to shape the petal as you glue can leave your fingers sore from the burns! And though I did purchase the protective Mod Podge finger caps to save my fingers from hot glue...I hardly ever use it while flower making as I find it very bulky and it slows me down!
Coloring Media : Though there are so many coloring media you can opt for , if you are looking to quickly add colors to your handmade flowers , options are
1. Use colored paper for different parts . A crafter friend Devika recently generously sent me some beautiful die cuts in white since she had seen me use a lot of white in my creations ...well yes I find using white very liberating as you can ink it to colors you want, leave it pristine white or elegant etc etc but actually the main reason I use white so much is because I dont own a lot of colored card stock!![He he LOL]
 |
| Paper Flower Tutorial |
For the flowers in this project I used 2 Cheery Lynn sunflower die cuts and 2 Memory box fringe border strips [ sorry picture shows only one but you need 2 to get a fluffy fringed center]
2. Ink Pads - believe me they are the easiest way to add a dash of color! And for this I prefer some types such distress ink pads rather than memento or archival ink !
 |
| Paper Flower Tutorial |
You can ink just the petal tips and not waste time inking the center as the center is going to be hidden by the fringed flower.
 |
| Paper Flower Tutorial |
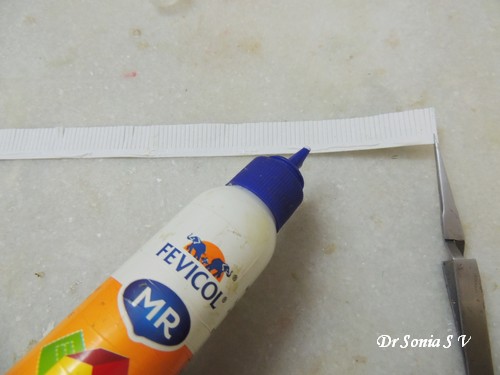
Make a long fringed paper strip by die cutting , hand cutting etc [ I have written a detailed post on fringing here :
Simple Flower tutorial ], grab one end with a forceps , apply adhesive and roll! For this flower I joined 2 fringed strips before rolling as I wanted a full and fluffy center.
 |
| Paper Flower Tutorial |
Dont roll your paper strip too tightly or too loosely ! It looks cool "un fluffed" but since we are talking about quick tips...the quick way to get a full looking center is to fluff out your rolled fringed strip!
 |
| Paper Flower Tutorial |
You can keep the fringed flower un inked or quickly add some color to it - again 2 quick tips:
1. Use a sponge to dab on some color just to the top of the fringed flower or
 |
| Paper Flower Tutorial |
2. An even quicker option --- grab the fringed flower and directly twirl it on your ink pad...it takes just seconds to ink your flower!!
 |
| Paper Flower Tutorial |
In this flower I only embossed the center part of the flower and didnt bother about the petals. Since I was using really thick paper as explained it held its shape well.
 |
| Easy Paper Flower Tutorial |
Stagger and glue 2 flowers and hot glue the fringed flower to the center!
 |
| Easy Paper Flower Tutorial |
And you are done! Add one more un embossed flower base if you want a fuller flower!Its not the most sophisticated looking flower but its a super easy and fun one to make!
 |
| Paper Flower Tutorial |
Do tell me how you like it Supplies :
Dies : Memory Box Spring border , Memory Box Fringe Border , Provocraft Butterfly , Marianne Designs Anja Leaf 3,Cheery Lynn Butterfly , Cheery Lynn Sunflower, Heartfelt creations Botanical Wings


Nenhum comentário:
Postar um comentário