Hi friends sharing a project combining my love for handmade flowers, diecutting and 3 D projects- and Easel Card with Drawer Box.
Easel Drawer Box
I have used gorgeous Lemoncraft papers[from dear friend Lisa ]and dozens of dies ;the exact names of which I have listed at the end of the post.
Foamiran Flowers
The butterfly in the photo above and the tiny bow in the photo below are clay embellishments made with air drying clay and molds and jazzed up with microfine glitter[ from brand dress my craft, crafters corner]
do it yourself web diyClay Embellishments
Since the theme at Cuttlebug mania includes bows I incorporated a variety of bows in this project. The top 2 corners of the easel card have paper bows from a Cottage Cutz die set, then there is a clay bow [ in photo above] and in the picture below is a dainty delicate bow die cut from foamiran.
Foamiran Bow
The shiny butterfly badge from Lemoncraft and is again a gift from dear Lisa! I used white crackle paste and Scrapberry petal stencil to add texturing on parts of the card[ you can see it peeking behind the bottle!]
Stencilling
The little bottle hanging from a handmade foamiran rose is filled with little hearts and micro mini pearls[ from dress my craft]
Bottle Charm
Foamiran Flower Tutorial
Foamiran Flower Tutorial
I have already introduced you to foamiran in an earlier post [ Foamiran Rose Tutorial ]..sharing an easy Tutorial to make simple foamiran flowers
More Tips while working with Foamiran
Foamiran sheets can differ in thickness : Foamiran sheets do differ in thickness even when you buy from genuine distributors so don't be dismayed if you find some sheets thicker than others. In this project the white foamiran sheets were slightly thicker than the pink ones and if you look closely you can see a very subtle difference in the flowers.
If you are diecutting foamiran sheets die cut 3- 5 flowers in one go depending on the thickness of your sheets. This helps to flatten your foamiran sheets even more!
Heating your flowers is completely optional but fun and can give a different look- In this project the buds were created using same Cheery Lynn sunflower die but after heating with the iron-box to curl the petals.
Jazz up the flowers using glitters. Here I used sparkling dust by dress my craft.
Adhesive- the easiest is hot glue and you can get a nice permanent bond but do remember to tackle those pesky glue strings while you make the flower and as soon as you glue otherwise your project will look like a nest with all those strings!!!
Foamiran Flowers
I made the drawer box using chipboard and recycling a desktop calendar!! It was a bit time consuming but very gratifying to make something from scratch! I dont have a full Tutorial but here are some pictures with tips.
Drawer Box
I first decided the dimensions of my drawer box and then cut out an arc using a steel plate as a guide.
Tip : Use sandpaper to smoothen the edges of cut chipboard and rectify any ragged edges.
Drawer Box Construction
Use carpenter's adhesive tape to help hold the pieces of your 3 D project in place while the wet glue dries!
Line the inside of the drawer box with pattern paper before you stick the top!
Foamiran Flowers
I first thought I would keep the drawer box flat and so I added a thin layer of foam as the base but added crystal feet [like in this Easel Card Drawer Box ]
Easel Card with Drawer Box
The metal handle was toned down with gesso to match the rest of the project and has a tiny fabric ribbon bow! And here is the Easel Card Drawer Box in my garden!
Easel Card with Drawer Box
I hope you liked the simple Tutorial and the overall project.
Supplies :To make the flowers: Foamiran Sheets, Oil Pastels, Pollen, Clay Molds- Plaid Trinkets Dies : Creative Expressions Sue Wilson Filigree 3 D ittybitty Bow,Spellbinders Labels 47 Decorative Elements,Spellbinders Curved Borders 2,Tonic Studios Birthday Swirl,Heartfelt creations Delightful Daisy Die,Heartfelt creations Classic Leaf Die, Cheery Lynn Sunflower, Cottage Cutz Spring Basket with Ducks,Dee's Distinctively Berry Sprigs Papers : Lemoncraft Fresh Summer; Stamps : Heartfelt Creations Open Leaf Stamp Dress My Craft Little Hearts, Sparkling Dust Craft Supplies from : Crafters Corner Edited : This project was featured as a winner at 613 Avenue Creates 206
Hi friends....have you ever made a card you felt happy about when you made it but months later thought...what a lame card and could never bring yourself to send it anyone?!!
Well I have quite a few of those "what was I thinking when I made that" type of cards in my collection ...and have been challenging myself to rework some of them rather than throw them away!
So here is the ancestor of this easel drawer card... a Glittery Card I just couldn't bring myself to send to anyone despite being in my stash since 2016!
Glitter Card
So I went to work on it using handmade flowers and dozens of die cuts and made a Birthday Card [as my DT project for Cuttlebugmania Challenge where the theme is Birthday]!
Wanted to play in a few favorite Challenges and so converted it into an easel card with blue and green color theme and dozens of butterflies for Mrs A's Butterfly Challenge !
Easel Drawer Box Card
I still didnt like the card much and so decided to try and wave a magic wand once again and tried to make it into an easel card with a drawer box!
Easel Drawer Box Card
My poor card was already quite bulky so rather than risk making a wobbly card stock drawer I very ambitiously made the drawer box from chipboard!
Easel Drawer Box Card
And that was easier said than done as it involved endless measuring and re- measuring, gluing and re-gluing!!!....Ufff...this sure wasn't one of those easy projects!
Easel Drawer Box Card
And though I am not a 100% happy with the overall project I do love how the drawer part turned out! The drawer pull has a metal butterfly I transformed into a shabby white beauty using Stampendous embossing powder.
Altered Butterfly
It did turn out gorgeous and shabby!!
Easel Drawer Box Card
The drawer box has blue crystal flowers as feet[ you can see the same Crystal flowers in this post : Crystal flower bouquet Tutorial ] and butterflies galore all around it.
Easel Drawer Box Card
The easel part rests on a pearl - rhinestone border and a gorgeous satin flower trim. When you lift up the easel...you will see birthday wishes once again and gorgeous peacock blue butterflies.
Easel Drawer Box Card
And on turning the card- box ...more birthday wishes!!!
Easel Drawer Box Card
I may be weird but after all the work I think I like the backside of the card drawer box more than the front!!
Easel Drawer Box Card
If you stayed with me till here without falling asleep or running away...Thank you so much !!!
Easel Drawer Box Card
And here are the dies I used!! :
Winnie and Walter Essentials Audrey Cutaways , Winnie and Walter Cover Model Multifaceted Cutaway,X cut 3 D Butterfly,Magnolia Doohickeys Vintage Box Lacing Coffee,Joy Crafts 6002-0251[Butterfly Border],Marianne Anjas Vintage Decoration LR0269,Cheery Lynn Large Rose,Cheery Lynn Flourish 13,Spellbinders Annabelle's Trousseau Layering Frame,Spellbinders Rose Creations ,Spellbinders Magnolia,Tonic Studios Birthday Swirl.
Dont forget to join in at the Cuttlebugmania Challenge with a Birthday themed project. It is special as we are celebrating Jannie's birthday [ Jannie is the sweet and wonderful owner of the Cuttlebugmania Challenge blog]
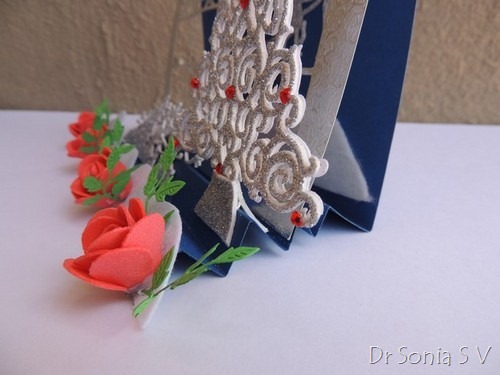
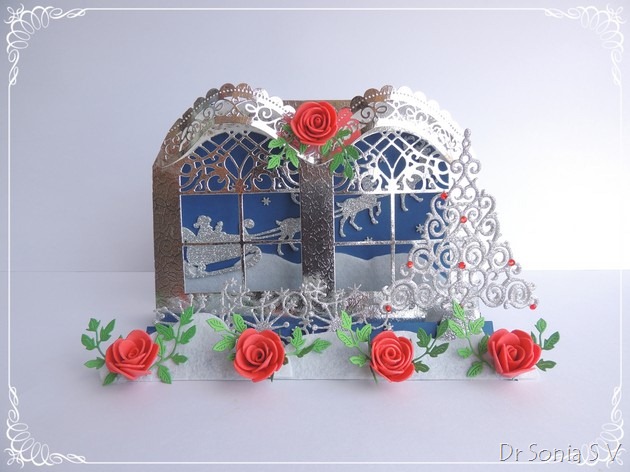
Dear friends designed this 3 D Window Pop up Card combining techniques from the Tunnel card tutorial and Interactive Window card tutorial featuring simple accordion folded steps as the pop up mechanism.The 3 D window [but not the arch] can fold flat onto the snowy Christmas scene featuring Santa and his reindeers in this pop up card.
Pop Up Christmas card
I added a rhinestone embellished foam Christmas tree and silver snowflakes on the steps in front of the windows.The snow was hand cut from felt and the roses are foam roses[Here are the tutorial links : Foam rose tutorial 1, Foam rose tutorial 2]
Foam Roses
3 D Window Pop up card tutorial
Materials Required
2 A4 size thick Paper - One to make the windows and one to make the background and steps.Contrasting colors are better to enhance the 3 D effect Glue and Scissors To cut windows- cut your windows using a craft knife and a cutting mat/ kitchen cutting board or use dies if you have a die cutting machine Optional : Scoring board
Pop up card tutorial
Make the windows : I used an A 4 pattern paper with a silver brocade pattern. You can use cardstock/ ivory sheets /thick good quality pattern paper.You will need only half of an A 4 card plus 3/4 inches. Fold the A 4 card in half and keeping approx 3/4 inches from the fold line as a glue tab discard the rest as shown in the pictorial.
Pop up card tutorial
Cut the windows : Use a craft knife and cutting board[ you can use a clean kitchen board if you don't have a craft mat] or your dies to cut out windows leaving at least a 3/4 inch border all around [anything less and your window front will not be stable and will buckle hopelessly !!]
Pop up card tutorial
To make the background and steps: Fold the base A 4 card in half .Score half of this A4 card every 3/4 inches and accordion fold as shown in the pictorial. It doesnt really matter if you dont have a scoring board as I am sure we have all made paper fans in childhood and its pretty much the same kind of accordion folds and you don't have to be super accurate even!
Pop up card tutorial
Glue the tab of your window panel onto the unfolded half of the "background card" as shown.You can either glue in front or behind like I have done.
Pop up card tutorial
Add scenic elements on your background card. I hand cut my snowy landscape from felt and my santa and reindeer are die cut from glitter foam.
Pop up card tutorial
Glue your window panel on the 2nd mountain formed by the accordion folds as shown in the pictorial. If you wish you can even add some more pop up design elements on the accordion folds behind your window
Pop up card tutorial
It can get a bit tricky to defy gravity on the steps in front of your pop up window.The picture shows how I made my Christmas tree stand upright by supporting it with additional foam glued to both slopes of the step.
Pop up card tutorial
This pop up card design can fold absolutely flat to fit into an envelope.This particular Pop up christmas card however needs a box envelope courtesy the foam roses and the 3 D arches I added atop my windows
Pop up card tutorial
I love making Pop up and interactive cards as I have a very appreciative little girl at home renovation and happy to tell you that this particular pop up card design received a thumbs up after thorough inspection by my 8 year old [ though she did say she preferred Santa Claus to have eyes !]
Pop up card tutorial
I hope you like this pop up mechanism.Do check out my Craft tutorials page for more tutorials including 24 Pop up card tutorials
Supplies :Dies: Cheery Lynn Flourish Leaf strip ,Cheery Lynn Windows A , Sizzix Santa sleigh with reindeer,Spellbinder Curved Borders 2 , Spellbinder Holiday tree ,Memory Box Frostyville borer
Dear friends many of you often ask me if I ever make simple cards as I have a deep love for Interactive and pop up cards!! Well sharing a simple fancy fold card .
Double Twisted Easel Card
I die cut musical signs on silver glitter foam and stuck it on a star embossed white scallop square to make a Double Twisted Easel card
Double Twisted Easel Card
I love how simple it is to make this type of easel card .Thank you Tanvi for reminding me of my own tutorial !! [see tutorial link : Double twisted Easel card tutorial ]and it folds flat to mail! Supplies : All from Itsy Bitsy:Bigshot, Dies : Spellbinder lacy heart,scallop lacy borders.Cuttlebug Musical sign.Sizzix embosslit rose,Couture creations scalloped squares.Itsy Bitsy Stars embossing folder.Itsy Bitsy Pigment Inkpads.Distress Ink pads Peeled Paint,worn lipstick