RANDOM POSTS
Mostrando postagens com marcador Paper Decoration Tutorials. Mostrar todas as postagens

domingo, 10 de junho de 2018

Shaker Rocker Card Tutorial #crafts #diyprojects #homerenovacion #remodeling #homeimprovement #renovation #diy @verefazer

Shaped Interactive Card
 Hi friends...Thank you for dropping by. I have a really fun project and Tutorial   to share. I made Interactive Shaker cards which have the classic window with shaker elements and in addition these shaped cards rock from side to side!
Shaker Rocker Card
 I made 2 milkshakes  as my DT project for Crealies for the new release blog relay . I first made a Kiwi milkshake. I love Kiwis...do you?

Shaker Card
 Created the froth in the milkshake using Crealies stamps which I heat embossed white and  made a gorgeous yummy creamy swirl atop and added a straw too!
Milkshake card
I had so much fun creating one milkshake card that I had to make another one too....and that is a strawberry milkshake!
Rocker Card
I stencilled over the Crealies Cardzz 05A die with Distress Inks  and used my friend Rajni Chawla's  Crystal Clear powder to create the gorgeous sparkling cream swirls.
I also added a real straw inside the strawberry milkshake...so you can guess how really big these cards are!
Milkshake Card

If you are familiar with making shaker cards these are pretty simple ...yet if you are interested I have a detailed Tutorial in the video below which also shows the rocker action.


Crealies Dies / Stansen:

Crealies Stamps/Stempels:


And do drop by the Crealies Blog to see lots of fun projects featuring the new Crealies release...there are milkshakes, cappuccinos, smoothies and more yummy  creations!
Here are links to more Shaker Tutorials

Other Supplies : Papers : DCWV Snack stack, Sequins from Dress My Craft 

quinta-feira, 16 de fevereiro de 2017

Fairy home renovation and Easy Paper Rose Tutorial #crafts #diyprojects #homerenovacion #remodeling #homeimprovement #renovation #diy @verefazer

Paper Rose Tutorial 
       Hi friends, I made a home renovation for the fairies in my garden with lots of glittery handmade flowers , magical vines and an inviting cozy fire inside!
Paper Rose Tutorial 
         To add to the fairyland charm , there are sparkling cascading teardrop crystal sprigs, beautiful velvet vine trails, a silver humming bird and a "charming" dragon fly !
Paper Rose Tutorial 
And of course the fairies do need a lot of sparkle and bling and cheerful colors to help make them feel "happy" at their home! The glittery "Happy" has a backdrop of two large lacy hearts to add a bit of magical romance!!
Paper Rose Tutorial 
I hope the little magical beings will love to flutter with the dragon flies and fly among the sparkling flowers!
Paper Rose Tutorial 
The fairy home renovation has a latched door which swings open and inside is a warm cozy light to keep the fairies snugly warm!
Paper Rose Tutorial 
He he now back to serious human crafty talk....here are some of the handmade paper flowers I have been obsessed with making the past few days!
Paper Rose Tutorial 
There are many many Tutorials on making a rose but since its such a tricky flower to make I always love to share if I find "easier" ways of making this beautiful flower!!
So lets jump right into the Paper Rose Tutorial- the easier way!!
Materials
  • Paper : You will get the best results with good quality thick card stock . My absolute favorite right now is Dress my Craft papers from Crafters Corner which is 285g thick , has excellent water absorbing and sculpting properties and takes on colors really well
  • Embossing Tools: You can actually make flowers by just using your fingers and a pen but having excellent tools will make your flower making quicker , more enjoyable and satisfying! I used the Dress my Craft Golf tool set from Crafters Corner
  • Flower Shapes : you can hand-cut, die cut or even punch [ but most punches wont punch very thick card stock] flower petal shapes. A 5 or 6 petal flower shape is the easiest to make a rose. Here I used Spellbinders Rose Creations dies and used  the 2nd largest die to get 4 die-cut flowers .
  • Coloring Media : you can use whatever you want. I prefer Distress Inks  
  • Adhesives : clear drying liquid adhesive or if you want to craft quickly then use a hot glue gun.
  • Embossing Pad : I personally like the pads made of thick foam .You can alternately use a mouse-pad too.
  • Mister and Towel. Since you are working with thick card stock you need to moisten your paper to be able to sculpt it. You can dip your flowers into a bowl of water but I find misting quicker and less messy. Use a paper towel of cloth towel to help mop dry your misted blooms.
  • Optional to jazz up your flowers:Glitter/Frosting Powder . My current favorite is Dress my Craft Sparkling dust
Paper Rose Tutorial 
Use any 5 petal flower shape and color whichever way you want.Use one color, ink only the edges or use 2 different shades. Just remember to color both surfaces of your flower as the rose is a 3 dimensional flower and you will see both sides on your final flower.
Mist lightly with water and blot gently with a towel.
Paper Rose Tutorial 
To quickly and easily form the central bud , use the largest of the golf tools and roll your flower petal around it
Paper Rose Tutorial 
This is so much quicker than embossing with  tools and much easier than simply trying to roll the petal into a cone using your fingers alone!
Paper Rose Tutorial 
Do the same with all the petals of your flower.
Paper Rose Tutorial 
To form a nice pointed cone, now take the 2nd largest golf tool and wrap one petal around it...sliding it up to the tapering end and rolling into a tight cone.
Paper Rose Tutorial 
What I loved about the Dress my Craft paper is that not only is it super easy to shape by this method but also the shape stays nicely...see how the petal doesn't uncoil immediately but gives time to glue!
Paper Rose Tutorial 
You need to do this with only one petal which will form the innermost core of your bud. Glue the other petals around this .You can use hot glue if you are adept with it [meaning not prone to burning yourself and not using too much] or use a clear drying adhesive of your choice.
Paper Rose Tutorial 
You can either glue the adjacent petals overlapping the edges or glue petals from opposite sides...it just slightly changes the look of your bud and gives a bit of variety!
Paper Rose Tutorial 
Your bud is now ready ! Add a calyx and its ready to go on a project as it is!
Paper Rose Tutorial 
For the layer immediately around the bud, again use the large golf tool and rather than emboss, simply wrap the petals around it like you did before.
Paper Rose Tutorial 
Optionally,  use the pointed tapered end of your 2nd largest or smaller golf tools and gently curve the edges of the petal outwards.
Paper Rose Tutorial 
 Glue around your bud
Paper Rose Tutorial 
You can achieve a tight or loose look for your rose by choosing where you apply the glue:
  • Apply glue only on the  base of the bud and you will have a looser more open kind of rose
  • Apply glue on the base and on the lower half of the sides of the bud...you will get a tighter rose!
Paper Rose Tutorial 
For the outer layers [you can add 2-3 depending on how full a flower you want] use the large golf tool to nicely cup and add subtle texture to the petals.
Paper Rose Tutorial 
If any area looks stiff ,switch to a smaller golf tool and go over that area. Keep in mind that if you want more embossing anytime switch to the smaller size of the golf tool.
Paper Rose Tutorial 
Invert the cup shaped flower and press the center with the round end of the largest golf tool.
Paper Rose Tutorial 
Glue this under your rosebud
Paper Rose Tutorial 
And so with just 3  die cuts  you have made a cute little rose!
Paper Rose Tutorial 
Add more layers if you want a fuller rose .
To jazz up your rose...apply adhesive medium [use spray adhesive, crackle paint, multi-medium matte, glossy accents etc] and sprinkle Dress my Craft sparkling dust or frosted sugar.
Paper Rose Tutorial 
Doesn't the rose look beautiful !!!
Handmade Paper Rose
 And the best thing is its not too hard to make !!
Handmade Paper Rose
 The pink one below is the one I used in the fairy tea light holder.
Handmade Paper Rose
And here is the tea light holder hanging from the  miniature orange tree in our home!
Paper Rose Tutorial
I hope you liked the home renovation I made for the fairies and found some of the flower making tricks I have shared useful.
Do tell me how it is.
Supplies :  Dies :  Winnie and Walter Happy Cutaway , Spellbinders Rose Creations  , Spellbinders Lace Hearts, Cheery Lynn  Humming bird, Cheery Lynn  dragonfly, Cheery Lynn  butterfly,
Stamps : Heartfelt Creations Open Leaf Stamp,Heartfelt creations Delightful Daisies Stamp
Inks : Distress Inks  
Dress my Craft products: Flower Making Paper : Dress my craft collection exotica and Floral Oriental collection paper.Golf Tools : LARGE, MEDIUM,  SMALL, MINI and NEW : Golf tool set.Sparkling Dust from Dress my Craft
Edited :
This project was featured in  the designer spotlight for the  Simon Says Stamps "Favorite tool Challenge "

domingo, 5 de junho de 2016

Peony Paper Flower Tutorial

Paper Peony Flower
         Hi friends sharing a bouquet of cheerful handmade Paper Peonies to brighten your day! I first made this Peony flower design for an Origami Box and it was so easy and fun to make I made a whole bunch!
Paper Peony Flower
         These huge flowers are as big as your palm and can easily fill up a flower vase you have at home.Mine are sitting prettily on  a bicycle cart my mom had gifted me ages back!
Paper Peony Flower
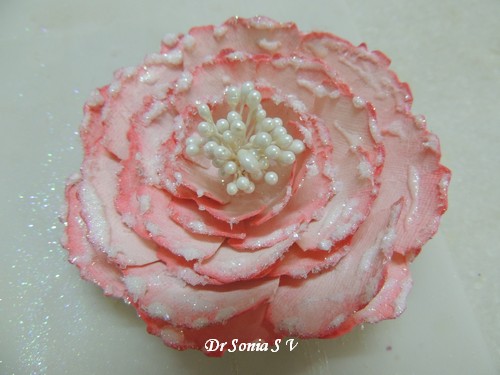
Used fine glitter and diamond dust to make my flowers sparkle!
Paper Peony Flower
How to make an easy Paper Peony Flower
Materials Required
  • Paper -handmade paper gives the best results [mine are from the Indian Craft Shop Itsy Bitsy]
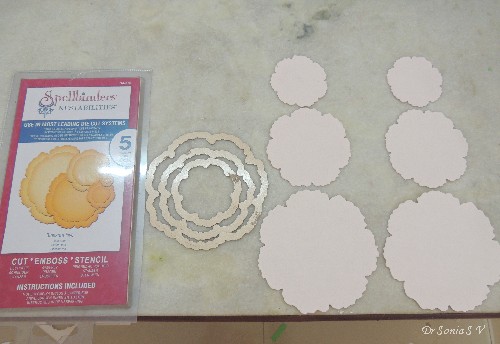
  • Flowers- hand-cut ,die cut or punched. I used diecuts from a  Spellbinders Nestablities Blossom Five die set
  • Scissors
  • Adhesive- Glue gun to quickly assemble your flower and liquid glue to add glitter and sparkle
  • Pollen - or any other center you want to add to your flowers
Here is the Video tutorial 

    And here is the  Pictorial 
    Cutting the Flowers
      Spellbinders Diecuts
                   You need 6 flowers to make your Paper Peony. I used the 3 large dies from a Spellbinders Nestablities Blossom Five die set to cut out 2 flowers each from each die.
                  If you don't have this particular die... it doesn't matter...you can alternately use any other flower shape die/punch which has  broad petals!
                 Also the shape is fairly easy to hand-cut if you just think of it as a circle with wavy borders  or you can follow the method in this link : Hand-cut Large Paper Flower tutorial 
      Cut the Flower Petal
      Cut in between the petals towards the middle  such that you cut 1/3rd of the diameter of the flower [ approx....no need to rack your brain or hunt for a scale to get the exact 1/3rd!]
      Peony Paper Flower Tutorial 
      Snip between the petals of all your flowers. This step just allows you to easily shape your flower.
      Peony Paper Flower Tutorial 
      Ink Petal Edges - optional

      Peony Paper Flower Tutorial 
      Inking the edges of the petals will give a totally cool look to your flower and just takes an extra few minutes!
      Peony Paper Flower Tutorial 
      Shape your Flower Petals

      Now what I love about this particular flower is you don't need to use an fancy tools....just your fingers!! And that makes its quick and easy!
      Peony Paper Flower Tutorial 
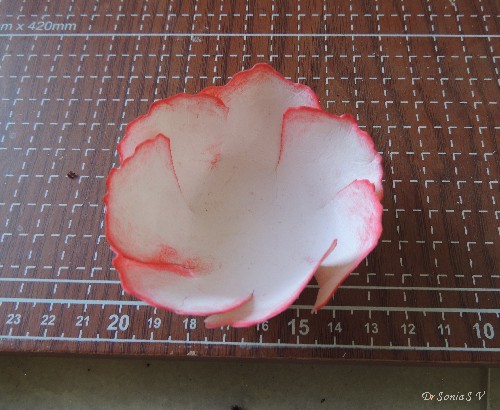
       Just bend your petal up at its base as shown in the picture above and curve the petal around your finger.
      Peony Paper Flower Tutorial
           Fold up and curl all your petals using your fingers and you will get a flower which is gently cupped with its petals curving towards the middle. If your paper is very thick you can use your embossing pad and tools to help you .
      Peony Paper Flower Tutorial 
      The next step is the coolest and is better seen in the video....cup your flower and squeeze in all the petals at the top.
      Peony Paper Flower Tutorial 
      Because of the snips and curls you had given the flower earlier it will easily form into a "bud" shape!
      Peony Paper Flower Tutorial 
      When you leave your fingers it will unfurl into a perfectly cupped and curled flower! Easy wasn't it!!
      Peony Paper Flower Tutorial 
      Assemble your Paper Peony Flower

      Peony Paper Flower Tutorial 
      Do the same steps for all 6 flowers and it's time to glue all the layers together

      Peony Paper Flower Tutorial 
      I like to start from the largest base flower and add the layers atop with the petals staggering.
      Peony Paper Flower Tutorial 
      Its easier to apply hot glue to the cupped smaller flower and stick it to the larger flower underneath as you go up.
      Peony Paper Flower Tutorial 
      Now that one doesn't look too impressive does it....well wait till you add a center and some sparkle!
      Flower Center
      Tie a bunch of pollen and hot glue it to the center of your Peony...and though I have shown a green floral wire...try to use something white so that it doesnt show!
      Add Sparkle and Shine to your Paper Flower

      Flower tutorial 
      You can use fine glitter/ chunky glitter/ diamond dust or whatever you fancy to add sparkle and a magical look to your flower.
      Flower tutorial 
       Add liquid glue to your petal edges and add the sparkling media of your choice!
      Flower tutorial 
      I used a mixture of Diamond dust and Glitter to make my Peonies!
      Paper Peony Flower
      The one above has diamond dust alone and the "wild honey" Peony has glitter alone.
      Paper Peony Flower
      The Purple one is my favorite and is all sparkly with a mixture of both diamond dust and fine glitter dusted on the petal tips!
      Paper Peony Flower
      I love making flowers and these Peonies look so cheerful ...dont you agree?
      Paper Peony Flower
      And that is the Bicycle flower cart with my Peonies on our terrace garden!
      Paper Peony Flower
      Hope you enjoyed the tutorial and my bouquet of Paper Peonies!
      Here is a pinnable image for fans of Pinterest
      Easy Peony tutorial 

      Linking to
      1. All Sorts Challenge 366 great outdoors
      2. 613 Avenue create
      3. Pixie's Snippets Playground 232 - the inner flowers are small and cut from snippets of leftover paper
      4. Simon Says Monday

      Advertisement

      Related Posts Plugin for WordPress, Blogger...