RANDOM POSTS
Mostrando postagens com marcador Mixed Media. Mostrar todas as postagens

segunda-feira, 18 de junho de 2018

Altered Bottle #crafts #diyprojects #homerenovacion #remodeling #homeimprovement #renovation #diy @verefazer

Altered Bottle
        Hi friends sharing a special DT project for  Cuttlebugmania  Challenge  " Summer ". This project is very dear to me as I have tried to capture memories of  our family's summer holidays to the beach and depict them on a bottle !
Bottle Art
Beaches and bottles always go together don't they so hehe I altered a bottle for my project!
Altered Bottle
After a liberal coat of gesso I  used Finnabair white crackle paste through Scrapberry's Dotted Pattern Stencil on different parts of the bottle to depict the foam of the sea!!

Stenciling
I love this crackle paste...it is so easy to use! Here is another project using it : Mixed Media Altered Book Tutorial 

Crackle Paste
For the "ocean waves" I stencilled  Ranger's texture paste through Carabelle Studio Geometrie 1 stencil
Mixed Media Altered Bottle
This is one of my favourite stencil designs and here is another project showcasing it : Mixed Media Box Tutorial
Stenciling
I like bright cheerful project so used a pastel blue paint to ink up the bottle.

Altered Bottle
One of our favourite activities as a family whenever we visit a beach is to collect sea shells and so I just had to add this sentiment stamp saying " To find a seashell is to find a world of imagination". I made the frame using Sakura air drying clay and a mould.

Altered Bottle
The lid of the bottle has sea gulls, a tiny bottle, shells, crystals and pearls...in fact all the treasures of the ocean with a liberal dusting of sparkling dust!!!
Altered Bottle 
One of my most memorable summer holidays was to Goa beach and one of the highlights of that trip was the thrill of seeing dolphins swimming in the ocean!!!
Altered Bottle 
On another summer holiday ...to my home renovation in Kerala...all of us got a chance to steer a large boat...and hence I added a wheel [ a joyrcrafts die cut inked with Distress Inks  and jazzed up with rainbow glitter]!!
Altered Bottle 
I also used clay to make star fishes ...to depict yet another holiday memory from Goa....being able to touch star fish!
Altered Bottle 
I added corals we got from Langkawi beach ...an amazing serene beach in Malaysia
Altered Bottle 

Altered Bottle 
The shells are from my treasure trove ...shells collected over the years from beach holidays!
Altered Bottle 
Couldnt resist adding a gorgeous lace and a large crystal heart!
Altered Bottle 
The "treasures of the ocean" is a stamp heat embossed in gold, die cut and dressed up with crackle paste!
Altered Bottle 
This side has " the voice of the sea speaks to the soul"!
Altered Bottle 
The sand dollar  is a real one ...collected from Goa beach!
Altered Bottle 
This side of the bottle  has leaping dolphins and a compass to guide us in journeys yet to come!
Altered Bottle 
I hope you  liked my "memory" bottle idea!!
Supplies :  All from Crafters Corner
Dies :  Memory Box Diving Dolphins, Poppy Stamps Birds in flight, Joy Crafts  Anchor-Ships wheel-Lifebuoy,Spellbinders  Curved Matting Basics A and B.
Stamps : Crafty Individuals Cl 272
Mixed Media Supplies : Ranger Texture Paste  Matt, Glass beads Gel, Finnabair Art extravaganza White Crackle Paste,
Dress My Craft : Sparkling Dust, Rainbow Glitter, Mini Pearls, Mini Micro Pearls,

Dont forget to participate in the  Cuttlebugmania  Challenge with a " Summer" project using dies or embossing folders. Jannie always has wonderful prizes for the winner.
Linking to  
613 Avenue Creates , All Sorts Challenge, Word Art Wednesda , Eclectic Ellapu June , Class Design Team Challenge June
Pixie's Snippets Playground - used lot of snippets...snippets of paper, snippets of clay, snippets of lace!

domingo, 9 de abril de 2017

Zig Brush Pens Water Coloring Tips #crafts #diyprojects #homerenovacion #remodeling #homeimprovement #renovation #diy @verefazer

Mini Album
       Hi friends, recently my family and I vacationed in Phuket , Thailand and we spent so much time in the oceans that for my DT post for Crafters Corner, I made a Mini Album in an Ocean theme with a cute water-colored mermaid, shells and various ocean motifs !
Handmade Flowers
I love making flowers and this project has quite a few handmade flowers. The big blue sparkling rose was made using Spellbinders Rose Creations  die using this Tutorial : Easy Rose Tutorial . The Magenta Fluffy flower was made from craft foam and the Cheery Lynn  Sun flower die using this Tutorial : Easy Daisy Tutorial and the Pink rose was made using craft foam and the Spellbinders Bauble Blossoms 1 die.

Handmade Flowers
I also added some handmade clay flowers [ the plumeria and the little white buds you see scattered around] made freehand using Thai Clay [ an air drying clay] and Oil paints. I love picking up shells from the beach and the shells on this mini album cover are shells I had picked up from our family holidays in Goa, Thailand and Malaysia over the years !
The Heat embossed " Treasures of the Ocean" is a stamp from Crafty Individuals [Cl 272] and such an apt one for this project!
Mixed Media background 
I made a mixed media style background using Ranger texture paste and a Carabelle Studio Geometry Stencil. Sprayed some Lindy's sprays and added tiny little pearls, turquoise blue glitter balls and golden star sequins! The anchor was cut using a Joy Crafts die.
Water-coloring and Diamond Dust 
The little mermaid who is the star of the project has a magical sparkling background with diamond dust, golden stars, a pearl star and dew drops!
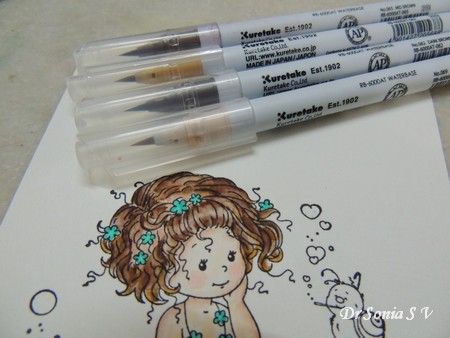
The Whismy Stamps Mermaid was watercolored with Kuretake Zig Clean Color Real Brush Pens 
In case you missed it here is my introductory post on Kuretake Zig Clean Color Real Brush Pens with lots of tips
And sharing more tips here.
1.If you are not heat embossing your image,stamp it with an ink such as Versa fine which will not react and bleed with water!
2.Allow enough time for the stamped image to dry before you water color or if you are in a hurry heat set it with a heat gun!

Use images which are perfectly dry

3.Download a color swatch chart like this one from Kuretake website or better still make a color swatch so that you wont have to keep trying pens to choose colors! This is especially useful when you are coloring an animal or human image!

  • When making a color swatch make one grouping the colors together rather than in a chronological order!
Kuretake Zig Clean Color Real Brush Pens  Color Swatch
4.While coloring an image such as an animal or human using different shades of the same color, apply dark colors first and blend out with the water brush. If you put dark colors later it is more difficult to blend without using more water!
Watercoloring with Zig  Brush Pens 
 For the tail of this mermaid I used turquoise green[ No 42] first and  pulled it inside with the water-brush.Later applied light blue [No 36] and blended it in nicely using the waterbrush again.
Watercoloring with Zig  Brush Pens 

5.Creating gradient effect!

Why I love the Zig brush pens compared to normal watercolors is that they are quite easy to use to create gradients and blends even for a beginner!
To easily create a gradient blending of colors the trick is to know where to lay on the first brushstrokes  first! 
    Brush on the ink on the edges and shadow areas
    Water-coloring with Zig  Brush Pens 
    Pull in the colors using the water brush!
    Water-coloring with Zig  Brush Pens 
    This is one of the easiest ways to get a fading away of a color! Here I have used just a singe color- May Green [No 47] and got a beautiful gradient effect by pulling in the colors using a water brush!
    Water-coloring with Zig  Brush Pens 
6.Always apply the brush pen directly to only small areas at a time as if it dries it wont blend well. If you find this method difficult then mix the ink and water on an acrylic block or other surface and then apply it to your paper
7.Coloring Skin Tones - I think you will all agree coloring skin is always challenging to a beginner. The Zig brush pens are available in a beautiful range of shades of browns and grays and pinks .
Water-coloring with Zig  Brush Pens 
 The Flesh Color [No 71] is one of the most useful colors in the Zigs set and using it alone you can get a beautiful skin tone. In this step by step however I first applied Blush [No 69]on the edges and shadow areas and pulled it in with a water-brush
Water-coloring with Zig  Brush Pens 
 Later went over the larger area with the Flesh Brush pen [ No 71]
Water-coloring with Zig  Brush Pens 
  • Adding Cheek blush!
Water-coloring with Zig  Brush Pens 
You can add life to your animal and human images by adding a bit of color to the cheeks using Tea Rose [No 220] or any shade of pink..... Just add a tiny bit of pinkish color and blend with the water brush!
8.While water-coloring tiny areas such as the flowers in this mermaid image use the brush pens directly and use very little or no water as it can bleed easily!
Water-coloring small areas!
9.Coloring Hair!
Water-coloring Hair
Coloring hair is always tricky no matter what coloring medium you use...the only thing I can say is before I got my Zigs the  hair of my colored images was a big blob...now its much much better!!
10.Last Tip is that if you don't get good results  with your attempts try changing the type of water brush you are using and/ or the type of watercolor paper you are using! There is no right or wrong product...just that one type of brush or paper might work better for you!
Zigs on different water color papers
When I worked on floral or freehand water coloring I didnt notice much difference in water coloring on different water color papers but for this intricate mermaid stamp I found that I had poorer control on the Brustro paper.On Brustro the pigment had a tendency to spread more on adding water , bled outside the lines quite a bit and had a splotchier look on layering the colors.
Water-colored Images on Canson and Brustro respectively
The colors were however more vibrant and rich on the Brustro Paper and lovely for freehand water-coloring.
So the main point is to experiment with different brands of watercolor paper if you are not happy with your attempts!
Ocean Themed Mini Album
I am not an expert at water-coloring but my coloring skills have improved tremendously after I got the Zig brush pens and I do hope some of these tips will be helpful if you have or are planning to buy these amazing watercolor pens! 

Here is a list of all the Supplies from Crafters Corner:Kuretake Zig Clean Color Real Brush Pens  .Wink of Stella.Cheery Lynn Dies :  sun flower,Cheery Lynn  Rose Leaf
Spellbinders : Spellbinders  Rose Creations  ,Dress my Craft: Dress my Craft  papers, Dress my Craft sparkling dust, Dress my Craft Sequins, Dress my Craft Golf tools,
Metal charms,Diamond Dust,Ranger Texture Paste,Stencil : Carabelle Studio Stencil Geometrie

quinta-feira, 15 de setembro de 2016

Easy Hinged Box Tutorial #crafts #diyprojects #homerenovacion #remodeling #homeimprovement #renovation #diy @verefazer

Hinged Box
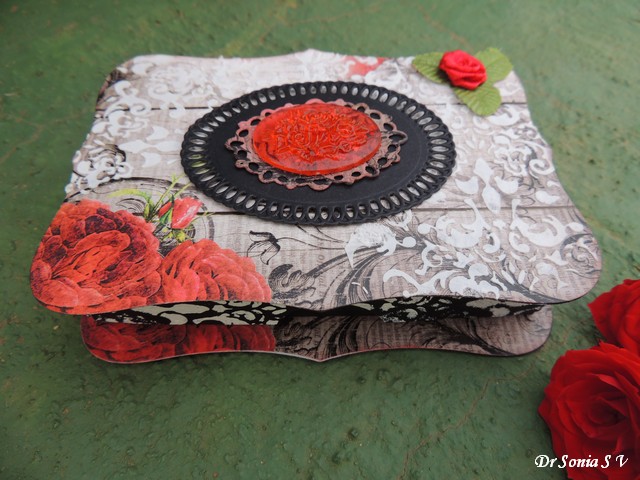
Hi friends , Thank you so much for the lovely comments on my Onam post!! Sharing a hinged box I made with  dies and some simple mixed media techniques!
Partitioned Hinged Box
The box as such measures 5 x 3 inches and is made from a single piece of cardstock measuring  9 x 7 inches and I made customised partitions for the inside .The cardstock is scored on the  9 inch side at 1, 4, 5 and 8 inches and on the  7 inch side at 1 and 6 inches. 

Hinged Box Tutorial 
Wedges are cut off for neater and easier gluing .Here is the link to the  detailed Tutorial : Hinged Box Tutorial 
Hinged Box Tutorial 
I used the Spellbinders Labels 8 die to die cut the base and lid of my box. As I wanted a sturdy box I layered 2 pieces of card stock under the pattern paper.
Hinged Box Tutorial 
Stencilled a design using texturing medium Whipped Spackle and the Memory Box Texture Adornment Stencil.
Hinged Box Tutorial 
The paper I used was so pretty I kept the embellishing to a minimum! Added a homemade resin cabochon [ made using resin and alcohol ink in a silicon mold] on an oval die cut.
Hinged Box 
Couldnt resist a tiny ribbon rose on the corner of the box!
Hinged Box
And here is the box with real roses from our garden!
Hinged Box  
Supplies : All from Crafters Corner
Dies :  Spellbinders Labels 8, Spellbinders Elegant Ovals
Stencil : Memory Box Texture Adornment Stencil 
Papers : Bob n Betty

Advertisement

Related Posts Plugin for WordPress, Blogger...