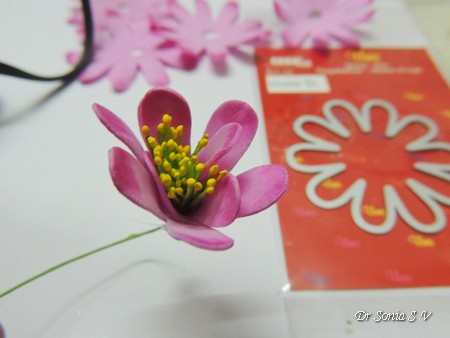
Hi friends...life has been super busy...but I am so happy to finally be able to squeeze in some time to share an easy foam flower Tutorial .This is a super easy method which does not require any heating but still yields a cute flower!
Easy Foamiran Flower Tutorial
Foamiran Flower Tutorial
Materials
Foamiran Sheets- these are foam sheets which are thinner than the easily available craft foam
Flower Shapes- Hand cut or die cut foam flowers. I used Crealies Flower dies in this project.
Inking Medium - Soft pastels or distress inks or anything else which you like- feel free to experiment!
Adhesive- hot glue gun
Pollen
I had tried shooting a Video Tutorial but it's been raining here in Bangalore and lighting has been very poor but since there are hardly any complicated steps ...I will share a step by step pictorial and hope you will bear with me!
1.Die cut flower shapes from foamiran - use 4-5 flower shapes to create one 3 D flower.
Tip :Die-cut 4-5 layers of foam in one go using your flower die- this not only helps save time but also helps to thin out your foam
Easy Foamiran Flower Tutorial
2. After the optional step of inking your flower , fold the flower in half and half again as shown in the picture above. 3. Twist this folded flower between your fingers- this helps to spread your soft pastel shading and also makes your foam flower more wavy and pliable
Easy Foamiran Flower Tutorial
4. Snip off a little from the pointed tip[ which is actually the flower center]
Easy Foamiran Flower Tutorial
5. Open up and you have your basic shape to work with!
Easy Foamiran Flower Tutorial
6. Do the same with 5 flower shapes[ please forgive the color difference in the steps below]
Easy Foamiran Flower Tutorial
7. Tie or hot glue a bunch of pollen for the center. Snip one flower from the edge to it's center as shown below
Easy Foamiran Flower Tutorial
8. Apply hot glue on the lower and middle part of one petal and place the pollen bunch on it and wrap the flower around the bunch of pollen...gluing as you wrap!
Easy Foamiran Flower Tutorial
9. Press the base to shape the flower.
Easy Foamiran Flower Tutorial
10. Insert this central part into other flower shapes...staggering the petals as you glue!
Easy Foamiran Flower Tutorial
11. You can quickly make a nice fluffy flower by adding just 2-3 more layers!
Easy Foamiran Flower Tutorial
I made a hanging decoration using the foamiran flowers , gorgeous papers form Lemoncraft and lots of Crealies dies. It has a flap and you can add a notebook inside if you want it to be functional!
Easy Foamiran Flowers
The beautiful window was cut using a Crealies dies and actually opens and closes on its hinge.I used Crealies dies to cut the base and the layered circles. The angel is handmade using clay and a silicon mould. The cute bow was cut using Crealies dies and glitter foam.
Handmade Embellishment
The crystal flower rests on a mosaic made with the Crealies Decorette XL no.12 die.
Hanging Decoration
The little purple buds peeking from between the large flowers were also made using the same Crealies flower dies.
Foamiran Flowers
Added faux leather tassels as danglers to complete the project!
Hanging Decoration
I hope you liked the simple flowers and the project idea.
Products: From Crafters Corner : Papers : Lemoncraft, Foamiran Sheets, Polllen, Sizzix Big Shot, Soft pastels,Lace, Tassels
Hi friends sharing a project combining my love for handmade flowers, diecutting and 3 D projects- and Easel Card with Drawer Box.
Easel Drawer Box
I have used gorgeous Lemoncraft papers[from dear friend Lisa ]and dozens of dies ;the exact names of which I have listed at the end of the post.
Foamiran Flowers
The butterfly in the photo above and the tiny bow in the photo below are clay embellishments made with air drying clay and molds and jazzed up with microfine glitter[ from brand dress my craft, crafters corner]
do it yourself web diyClay Embellishments
Since the theme at Cuttlebug mania includes bows I incorporated a variety of bows in this project. The top 2 corners of the easel card have paper bows from a Cottage Cutz die set, then there is a clay bow [ in photo above] and in the picture below is a dainty delicate bow die cut from foamiran.
Foamiran Bow
The shiny butterfly badge from Lemoncraft and is again a gift from dear Lisa! I used white crackle paste and Scrapberry petal stencil to add texturing on parts of the card[ you can see it peeking behind the bottle!]
Stencilling
The little bottle hanging from a handmade foamiran rose is filled with little hearts and micro mini pearls[ from dress my craft]
Bottle Charm
Foamiran Flower Tutorial
Foamiran Flower Tutorial
I have already introduced you to foamiran in an earlier post [ Foamiran Rose Tutorial ]..sharing an easy Tutorial to make simple foamiran flowers
More Tips while working with Foamiran
Foamiran sheets can differ in thickness : Foamiran sheets do differ in thickness even when you buy from genuine distributors so don't be dismayed if you find some sheets thicker than others. In this project the white foamiran sheets were slightly thicker than the pink ones and if you look closely you can see a very subtle difference in the flowers.
If you are diecutting foamiran sheets die cut 3- 5 flowers in one go depending on the thickness of your sheets. This helps to flatten your foamiran sheets even more!
Heating your flowers is completely optional but fun and can give a different look- In this project the buds were created using same Cheery Lynn sunflower die but after heating with the iron-box to curl the petals.
Jazz up the flowers using glitters. Here I used sparkling dust by dress my craft.
Adhesive- the easiest is hot glue and you can get a nice permanent bond but do remember to tackle those pesky glue strings while you make the flower and as soon as you glue otherwise your project will look like a nest with all those strings!!!
Foamiran Flowers
I made the drawer box using chipboard and recycling a desktop calendar!! It was a bit time consuming but very gratifying to make something from scratch! I dont have a full Tutorial but here are some pictures with tips.
Drawer Box
I first decided the dimensions of my drawer box and then cut out an arc using a steel plate as a guide.
Tip : Use sandpaper to smoothen the edges of cut chipboard and rectify any ragged edges.
Drawer Box Construction
Use carpenter's adhesive tape to help hold the pieces of your 3 D project in place while the wet glue dries!
Line the inside of the drawer box with pattern paper before you stick the top!
Foamiran Flowers
I first thought I would keep the drawer box flat and so I added a thin layer of foam as the base but added crystal feet [like in this Easel Card Drawer Box ]
Easel Card with Drawer Box
The metal handle was toned down with gesso to match the rest of the project and has a tiny fabric ribbon bow! And here is the Easel Card Drawer Box in my garden!
Easel Card with Drawer Box
I hope you liked the simple Tutorial and the overall project.
Supplies :To make the flowers: Foamiran Sheets, Oil Pastels, Pollen, Clay Molds- Plaid Trinkets Dies : Creative Expressions Sue Wilson Filigree 3 D ittybitty Bow,Spellbinders Labels 47 Decorative Elements,Spellbinders Curved Borders 2,Tonic Studios Birthday Swirl,Heartfelt creations Delightful Daisy Die,Heartfelt creations Classic Leaf Die, Cheery Lynn Sunflower, Cottage Cutz Spring Basket with Ducks,Dee's Distinctively Berry Sprigs Papers : Lemoncraft Fresh Summer; Stamps : Heartfelt Creations Open Leaf Stamp Dress My Craft Little Hearts, Sparkling Dust Craft Supplies from : Crafters Corner Edited : This project was featured as a winner at 613 Avenue Creates 206