 |
| Mini Album |
Hi friends, recently my family and I vacationed in Phuket , Thailand and we spent so much time in the oceans that for my DT post for Crafters Corner, I made a Mini Album in an Ocean theme with a cute water-colored mermaid, shells and various ocean motifs !
 |
| Handmade Flowers |
I love making flowers and this project has quite a few handmade flowers. The big blue sparkling rose was made using Spellbinders Rose Creations die using this Tutorial :
Easy Rose Tutorial . The Magenta Fluffy flower was made from craft foam and the Cheery Lynn Sun flower die using this Tutorial :
Easy Daisy Tutorial and the Pink rose was made using craft foam and the Spellbinders Bauble Blossoms 1 die.
 |
| Handmade Flowers |
I also added some handmade clay flowers [ the plumeria and the little white buds you see scattered around] made freehand using Thai Clay [ an air drying clay] and Oil paints. I love picking up shells from the beach and the shells on this mini album cover are shells I had picked up from our family holidays in Goa, Thailand and Malaysia over the years !
The Heat embossed " Treasures of the Ocean" is a stamp from Crafty Individuals [Cl 272] and such an apt one for this project!
 |
| Mixed Media background |
I made a mixed media style background using Ranger texture paste and a Carabelle Studio Geometry Stencil. Sprayed some Lindy's sprays and added tiny little pearls, turquoise blue glitter balls and golden star sequins! The anchor was cut using a Joy Crafts die.
 |
| Water-coloring and Diamond Dust |
The little mermaid who is the star of the project has a magical sparkling background with diamond dust, golden stars, a pearl star and dew drops!
The Whismy Stamps Mermaid was watercolored with Kuretake Zig Clean Color Real Brush Pens
And sharing more tips here.
1.If you are not heat embossing your image,stamp it with an ink such as Versa fine which will not react and bleed with water!
2.Allow enough time for the stamped image to dry before you water color or if you are in a hurry heat set it with a heat gun!
 |
| Use images which are perfectly dry |
3.Download a color swatch chart like this one from Kuretake website or better still make a color swatch so that you wont have to keep trying pens to choose colors! This is especially useful when you are coloring an animal or human image!- When making a color swatch make one grouping the colors together rather than in a chronological order!
 |
| Kuretake Zig Clean Color Real Brush Pens Color Swatch |
4.While coloring an image such as an animal or human using different shades of the same color, apply dark colors first and blend out with the water brush. If you put dark colors later it is more difficult to blend without using more water! |
| Watercoloring with Zig Brush Pens |
For the tail of this mermaid I used turquoise green[ No 42] first and pulled it inside with the water-brush.Later applied light blue [No 36] and blended it in nicely using the waterbrush again.
 |
| Watercoloring with Zig Brush Pens |
5.Creating gradient effect!Why I love the Zig brush pens compared to normal watercolors is that they are quite easy to use to create gradients and blends even for a beginner!To easily create a gradient blending of colors the trick is to know where to lay on the first brushstrokes first! Brush on the ink on the edges and shadow areas |
| Water-coloring with Zig Brush Pens |
Pull in the colors using the water brush! |
| Water-coloring with Zig Brush Pens |
This is one of the easiest ways to get a fading away of a color! Here I have used just a singe color- May Green [No 47] and got a beautiful gradient effect by pulling in the colors using a water brush! |
| Water-coloring with Zig Brush Pens |
6.Always apply the brush pen directly to only small areas at a time as if it dries it wont blend well. If you find this method difficult then mix the ink and water on an acrylic block or other surface and then apply it to your paper7.Coloring Skin Tones - I think you will all agree coloring skin is always challenging to a beginner. The Zig brush pens are available in a beautiful range of shades of browns and grays and pinks .
 |
Water-coloring with Zig Brush Pens
|
The Flesh Color [No 71] is one of the most useful colors in the Zigs set and using it alone you can get a beautiful skin tone. In this step by step however I first applied Blush [No 69]on the edges and shadow areas and pulled it in with a water-brush
 |
| Water-coloring with Zig Brush Pens |
Later went over the larger area with the Flesh Brush pen [ No 71]
 |
| Water-coloring with Zig Brush Pens |
 |
| Water-coloring with Zig Brush Pens |
You can add life to your animal and human images by adding a bit of color to the cheeks using Tea Rose [No 220] or any shade of pink..... Just add a tiny bit of pinkish color and blend with the water brush!8.While water-coloring tiny areas such as the flowers in this mermaid image use the brush pens directly and use very little or no water as it can bleed easily!
 |
| Water-coloring small areas! |
9.Coloring Hair!
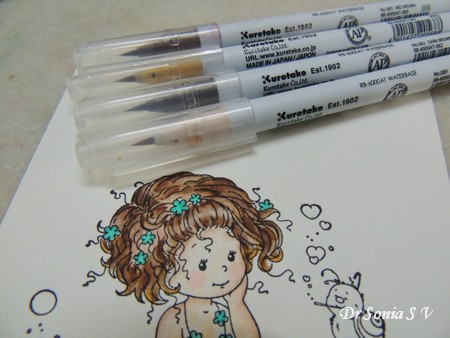 |
| Water-coloring Hair |
Coloring hair is always tricky no matter what coloring medium you use...the only thing I can say is before I got my Zigs the hair of my colored images was a big blob...now its much much better!!
10.Last Tip is that if you don't get good results with your attempts try changing the type of
water brush you are using and/ or the type of
watercolor paper you are using! There is no right or wrong product...just that one type of brush or paper might work better for you!
 |
| Zigs on different water color papers |
When I worked on floral or freehand water coloring I didnt notice much difference in water coloring on different water color papers but for this intricate mermaid stamp I found that I had poorer control on the Brustro paper.On Brustro the pigment had a tendency to spread more on adding water , bled outside the lines quite a bit and had a splotchier look on layering the colors.
 |
| Water-colored Images on Canson and Brustro respectively |
The colors were however more vibrant and rich on the Brustro Paper and lovely for freehand water-coloring.
So the main point is to experiment with different brands of watercolor paper if you are not happy with your attempts! |
| Ocean Themed Mini Album |
I am not an expert at water-coloring but my coloring skills have improved tremendously after I got the Zig brush pens and I do hope some of these tips will be helpful if you have or are planning to buy these amazing watercolor pens!
Here is a list of all the Supplies from Crafters Corner:Kuretake Zig Clean Color Real Brush Pens .Wink of Stella.Cheery Lynn Dies : sun flower,Cheery Lynn Rose LeafSpellbinders : Spellbinders Rose Creations ,Dress my Craft: Dress my Craft papers, Dress my Craft sparkling dust, Dress my Craft Sequins, Dress my Craft Golf tools,
Metal charms,Diamond Dust,Ranger Texture Paste,Stencil : Carabelle Studio Stencil Geometrie


