RANDOM POSTS
Mostrando postagens com marcador Swinging Card Tutorial. Mostrar todas as postagens

quarta-feira, 9 de julho de 2014

Swinging Card Tutorial #crafts #diyprojects #homerenovacion #remodeling #homeimprovement #renovation #diy @verefazer


Swinging Card 8
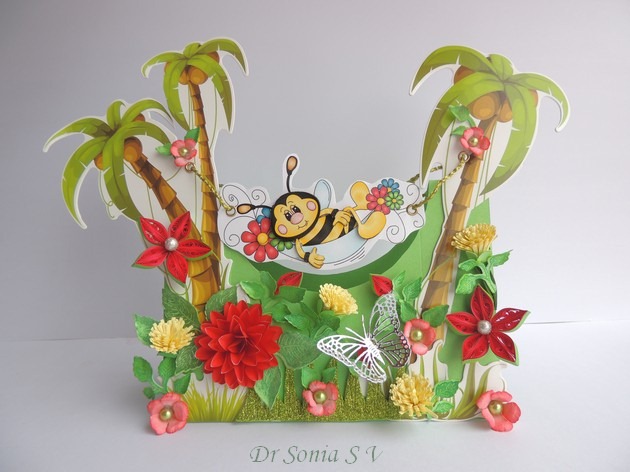
Swinging Card
      Dear friends this interactive swinging card is my Guest DT post for  Digital Delights  for winning the Petal Power challenge with my Mother’s Day Card.
         Delightful challenges holds a very special place in my heart as I won my first Guest DT post ever [back in 2011] with  this Quilled Sunflower Girl…I was so nervous when I used their digital image [ first time I worked with digis ]  in a Side step pop up card which was my first guest DT post and that card in turn won me a Guest DT at  Crafty JC ! 
        I have done numerous Guest DT posts since then for various websites and craft shops but believe me I still get super nervous as to how a Guest Post will be received!I hope you guys enjoy this Easy to make Swinging card and tutorial
Swinging Card 9
Swinging Card
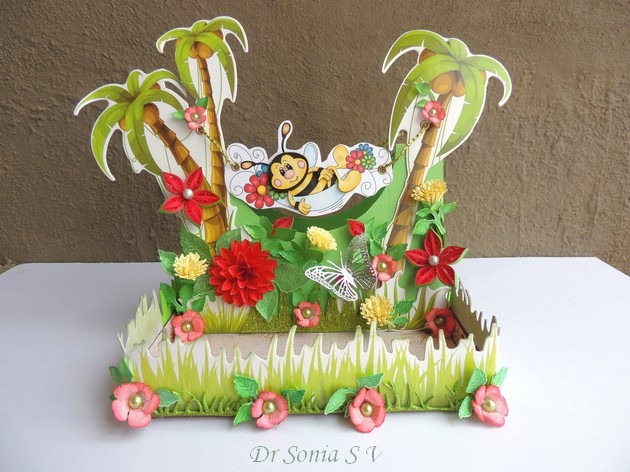
         I used the super cute digital image "Relax Barnaby" from Digital Delights, 3D decoupaged him and suspended his hammock from palm trees in this tropical paradise themed swinging interactive card.
Swinging Card 10
Swinging Card
       My daughter is forever searching for her eraser and pencil sharpener during homework time and I had been intending to make a  tray to hold her stationary...so I placed my interactive tent card on a cardboard box lid dressed up with glitter foam grass and handmade flowers.
Swinging Card 5
Handmade flowers
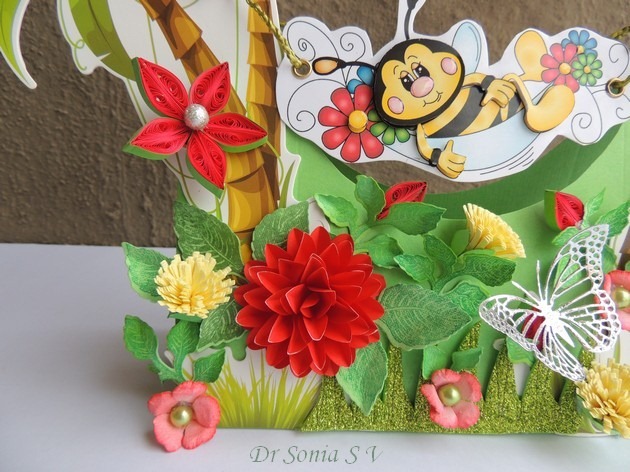
What is paradise without some flowers so added some quilled flowers and stamped leaves to my tent card.
Swinging Card 6
Handmade flowers
I always make my own flowers and the large red flower is also handmade and here is the tutorial link : Easy Flower tutorial 

Sharing How to make a Swinging Card

Material required
Cardstock - any size will do but I used an A 4 and a 6 x 8 inch piece of card stock
Glue- I used Fevicol MR 
Scissors
Something to cut an aperture
To punch holes- single hole punch  or crop a dile
Twine, thread or ribbon to suspend your image
Optional - Scoring board, Eyelets and eyelet setter / crop a dile
Swinging Card tutorial  1
Swinging Card Tutorial
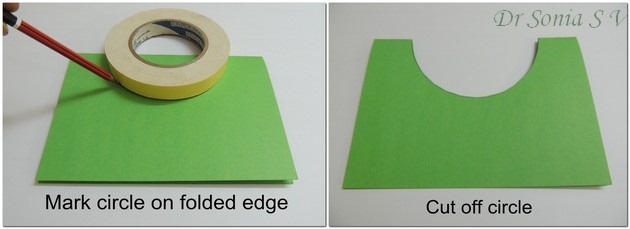
         On the folded edge of an A 4 card mark a semicircle  using a template [ use anything you have like a plate, lid, circle die,or even a  foam tape like I used here]-- just make sure you leave 1 1/2 - 2 inches on either side so that your card remains sturdy! 
         Cut out a semi circle ,oval, square or rectangle aperture [ the aperture can be any shape you fancy!] on the folded edge cutting through both halves of your A 4 card
Swinging Card tutorial  2
Swinging Card Tutorial
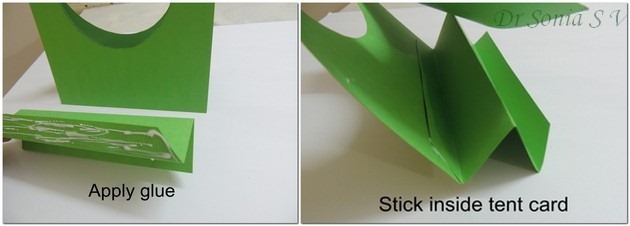
            As an interactive card is going to be played with quite a bit  you need a good sturdy base so that it doesn't topple over! I chose a 6 x 8 inch card [ you can play with measurements] and  folded it in half [ center mountain fold] and then folded up [valley fold]1 inch on either side to get an accordion fold in the shape of a  " W ".
If you have a scoring board :score on the 6 inch side at  1 , 3 and  5 inch marks.
Swinging Card tutorial  3
Swinging Card Tutorial
        The 1 inch folded parts of your accordion folded " W "are your gluing tabs.Apply glue to one gluing tab of the " w " as shown and stick it inside the tent card you had already made.Apply enough glue and pressure as its important to get a good adhesion here.
Swinging Card tutorial  4
Swinging Card Tutorial
          Fold your " W " accordion and apply glue on the other gluing tab and firmly stick the other flap of your tent card onto it. The tent card on which your swinging element is going to be hung is ready!
Swinging Card 2
Swinging Card Tutorial
           On either side of  your aperture ,add decorative elements such as trees, vines ,lattices or whatever element fits in with the theme of your card.You can allow it to jut above the folded edge of your card just dont embellish the top of  your tent card heavily
Swinging Card 7
3 D Decoupaged image
          As a swinging element I 3 D decoupaged the cute honey bee by cutting him and layering using foam dots. Can you see the shiny flower centers and shiny nose and cheeks of the cute bee ? [ courtesy glossy accents] You can choose any swinging style image like a child on a swing  or a  hammock , a bird on a branch etc.Punch holes on either side and attach to the tent card with twine, thread or ribbon. 
Swinging Card 11
Swinging card
       You can actually make the image fit right inside the aperture so that it swings freely to and fro . Since  both my clinic and home renovation printers were acting crazy I had to depend on a printing shop to print  my digital image and I couldn't get my image size a perfect fit but my little bee still swings happily !
Swinging Card  13
Swinging card
Another tip : Do heavily embellish the base of the card like I have done with flowers galore or whatever  you fancy and keep the top relatively simple as otherwise your card will topple over!
You can also decorate both sides of your swinging card like I did in Spinning card tutorial 1 and Spinning card tutorial 2

I hope you like this interactive card which actually doesn't require any fancy tools to make.

Supplies : Spellbinder Classic Leaf ,Spellbinder Rose creations,Cheery Lynn Butterfly,Memory Box fringe, Cheery Lynn Grass,

Linking to  Deep Ocean Challenge Fav 2014 Card
Edited : This card came top 3 in Digi Sketch In the garden theme
Top 3
This swinging card also came Top 3 at BGC Kiddish theme
Beyond Grey Challenges

terça-feira, 30 de julho de 2013

Teachers Days Cards - Spinning Card Tutorial #crafts #diyprojects #homerenovacion #remodeling #homeimprovement #renovation #diy @verefazer

Teachers Day Card
Wondering why I am making Teachers day cards in July...? Well in India we celebrate Teachers day in September and my daughter has so many favorite teachers that I think I will need to make at least a dozen special Thank You style Teachers Day cards .
Teachers Day Card
I had a ball using beads on this project and made a beaded butterfly [similar one here : Beaded Flowers tutorial]
Crafted a 3 D decoupaged fairy who swings, spins and literally soars into the sky in this kinetic card! 
Kinetic card
In this photo you can see how the butterfly charm dangles when the fairy spins up.My fairy has 6 layers popped up on foam and boy was she time consuming to make!!
Spinning Card
Here is the aerial view of the spinning kinetic card
Spinning Card
Since its a self standing spinning card I embellished the other side too.Added more 3 D decoupaged fairies,a glittery Thank U,silver peacock feather die cuts and lots of butterflies and punchcraft flowers on the other side of the Teachers Day Card
Teachers Day Card
This design is one of my most popular card designs on this blog and here is the original spinning card. Some of my blog friends said they found my first spinning card tutorial a bit difficult so I thought I would tweak the tutorial a bit in this spinning card tutorial.
Materials Required
  • Card stock - An A 4 for the base card and 2 roughly 4 x 5.5 inches pieces for the central spinner.Thick Card stock is preferred - The base card which forms your stand for the spinner needs to be particularly strong as it is a stand for your card and has to support the weight of your wooden stick and spinner card.The spinner card also should not be thin as otherwise it will be floppy and unsightly.
  • Scissors
  • Glue
  • Double sided tape or glue dots - makes life easier while making the central spinner.
  • Wooden skewer or anything else you can think of which can take the weight of the central spinning part of your spinner card
Spinning Card Tutorial
I used  Spellbinder Die cuts [measures 4 x 5.5 inches]as my central spinner.But you dont actually need any fancy tools to make a spinner card as shown in my first spinning card tutorial
I trimmed an A 4 card into 8 x 11 inches and folded it in half to make my base card.
Positioned the lower half of the Central spinner in the middle of the folded edge and marked around it leaving enough gap [1/4 inch on sides and 1/2 inch below]all around .This central rectangle is 1 3/4 inches from each edge [as shown by the scoreboard markings].
Cut out this marked area [folded it measures 4.5 x 3.25 inches]from both halves of your folded base card
Spinning Card Tutorial
Punch a border on your base card if you wish.Take a wooden skewer and trim off the excess so that it fits well within the width of your base card as shown in the picture above of the spinning card tutorial
Spinning Card Tutorial
To Make the central spinner : Take 2 die cut/hand cut shapes [approx 4 x 5.5 inches]and center the skewer on one die cut as shown.Apply double sided sticky tape or glue dots above and below and stick on the other die cut/hand cut piece and you have made your spinner!
Spinning Card Tutorial
Position your spinner inside your base card and see if it has space to swing freely [ you can do some trimming on the aperture made in your base card if your spinner is not spinning well]
Spinning Card Tutorial
Make the supports for your spinning mechanism: from thick card stock cut out two 2 x 1 inch strips and score at 3/4 inch , 1 and 1 1/4 inch .Fold this into an M as shown above.The gutters of the M support the skewer on either side of the central spinner.Stick the long legs of the M inside the folded top edge of  base card.I stuck the M legs of both strips [on either side of spinner aperture] on the inside of the back half of the base card first, then placed the skewer in the gutter and glued on the other leg to the inside of the front half of the base card.
Spinning Card Tutorial
Your spinner card is actually done but it may have a tendency to fall especially if your spinner is heavy.
In that case make a stand for your spinner card like I did.Take 2 strips of card stock 2 x 6 inches and score at 1 3/4, 3 , and 4 1/4 inches.Punch borders if you wish and fold into an M as shown.Align it to line the lower corners of the front and back layers of your base card and you have made a sturdy stand for your spinning card
Spinning Card
Here is the back view of my spinning Teachers Day card

Teachers Day Card
And here is the front view with a fairy child soaring up into the sky in this Teachers Day card!!!
Teachers Day Card
Thank you for sitting through this long tutorial. Since its a technically tricky card design I wanted to give as many details as possible. Do tell me how you like it.
Supplies : Fairies decoupage sheets ,Punches : Martha Stewart,Jef Butterfly,Jef flower and daisy,Dies : Spellbinders Rectangle,Spellbinders Peacock,Couture creation Oval, Cheery Lynn Butterflies 
Edited : 
This project was winner at Itsy Bitsy Sizzix tutorial challenge
This project was Top 3 at Whoopsy Daisy things with wings theme challenge
TOP THREE BANNER

Also got an honorable mention at Catchy Challenges

Advertisement

Related Posts Plugin for WordPress, Blogger...