RANDOM POSTS
Mostrando postagens com marcador Digital Images. Mostrar todas as postagens

terça-feira, 16 de setembro de 2014

Faux Tiles and Foam Bows #crafts #diyprojects #homerenovacion #remodeling #homeimprovement #renovation #diy @verefazer

Foam Crafts 2
Faux tile Technique
Dear friends ,Thank you so much for the wonderful congratulations [on Facebook and my blog]!!
For my Guest DT project at Tuesday Throwdown  , I was sent a beautiful colored picture called Spring Blocks from Deedee's Digis featuring lovely crocus flowers and had to use it to make a project in the theme “Bows and Butterflies”.
I wanted to highlight the image and tried out a “Faux Tile” technique [inspired by my most talented blogger friend Valerie Ann aka Mrs A]. Most faux tile techniques involve cutting the image into squares and adding glossy accents for the shine.
In my country [ my Indian crafty friends will agree I am sure], its not easy to get craft supplies and so most of us hoard our supplies like crazy! I have been managing with a small bottle of glossy accents since 2 years and I didn’t have the heart to finish it on one project!

Foam Crafts 3
Faux tile Technique
So used a different Faux tile technique!Scored the image every inch , sponged it all over with Versamark watermark ink , poured clear sparkle embossing powder on it and heat embossed to get this beautiful sparkling and textured tiled image!
If you are new to  Heat Embossing  [like me!] , here are a few other ways to have fun with embossing
And my favorite Embossing powder which you may have guessed is the WOW Clear Sparkle!
Foam Crafts 4
Foam Bow
Made a background by layering Spellbinders Borders and adding my favorite Cheery Lynn  butterfly and a glittery foam bow.
This was one of the rare times my husband noticed my card and said it looked beautiful ! But my usual supporter in crafting, my 8 year old daughter said " Its Okay" !!
So I dont know...I think I have to leave it to my blogger friends to tell me how it is!

Supplies : Dies : Lifestyle crafts Bow,Spellbinders Borderabilities Curved Borders 2 ,Cheery Lynn  Butterfly,Spellbinders Shapeabilities Lace Hearts.Embossing : Versamark Watermark ,WOW Clear Sparkle Embossing Powders
Linking to : Imaginations Sep[Embossing]Sparkles Monthly Challenge 60oct 15 [ things with wings]

terça-feira, 2 de setembro de 2014

Easy Beaded Flower Spray tutorial #crafts #diyprojects #homerenovacion #remodeling #homeimprovement #renovation #diy @verefazer

Beaded flower tutorial 2
Beaded Flowers Box
       This Baby themed box is my guest DT project for Tuesday Throwdown. I generally shy away from working with digital images as I am not very patient at coloring images but when the super talented Davi invited me to be Guest DT at Tuesday Throwdown and warned me I would have to work with digital images I couldn't turn her down!
Beaded flower tutorial 1
Recycling Craft
        Altered this cardboard box by lining it with pattern paper and layering with die cuts.I colored the cute Robyn Fetish image called "Lucy" with Staedtler watercolors [my first attempt at watercoloring with pencils!!] and added a diamond heart pendant in her hand [the diamond heart was salvaged from a broken earring!]
Beaded flower tutorial 4
Baby theme Box
        Inked and embossed the edges of the wild rose floral frame die cut with clear sparkle embossing powder to give a subtle sparkle.Added a tiny baby foot and a "baby" atop pink flowers on the corners of my box.My daughter wanted to know why I added a baby's foot on the flower..... I told her its a magical baby and was born from a flower !!
Beaded flower tutorial 5
Parchment Bow
       I made a bow from vellum using the lifestyle crafts Bow die and inked it pastel pink. If you love bows be sure to check out my  friend Sindhu's post on some super clever ways to make bows with dies.
Beaded flower tutorial 6
Beaded Flowers
The pink daisy is a handmade foam flower [made by Daisy flower tutorial] you saw aplenty in the fairyland diorama too!
The beaded flowers  you see in this altered box were super easy to make and so sharing this super simple tutorial to make a beaded flower spray
Materials Required
Beaded flower tutorial 13
Beaded Flowers tutorial 
  • Beads - any shape or size you fancy
  • Wire - work with whatever gauge you are comfortable with!
  • Scissors or wire cutter- I used my favourite Tim Holtz scissors
  • Floral tape - in green ,brown or whatever color you fancy [ only recently I came to know that floral tape is available in pink color as well!!]
Beaded flower tutorial 8
Beaded Flowers tutorial 
Depending on the size of your beads and the length of the flower branches you want cut a length of wire. I cut 3.5 inches wire to make each beaded flower branch. Its better to cut more wire than you need till you get the hang of it!! Thread 3 beads onto the center of the wire and bend the wire in a gentle U.
Beaded flower tutorial 9
Beaded Flowers tutorial 
Hold the 3 beads in one hand and twist the wires to make a beaded flower branch! Super easy isn't it!!
Beaded flower tutorial 
Make more flower beaded flower branches and cut a length of floral tape as long as your beaded flower stem.
Beaded flower tutorial 10
Beaded Flowers tutorial 
        Twist one flower branch around another and once its fairly tightly twisted add another one.Dont worry about poking wire ends or bumpy bends..you are going to cover all that in floral tape!
Beaded flower tutorial 11
Beaded Flowers tutorial 
      Whoever invented floral tape is a genius!!I just love working with floral tape...it doesn't feel super sticky but sticks to itself so beautifully!...just wrap your floral tape around your beaded flower branches and keep pressing firmly while you roll it around your beaded flower stem.You don't even have to glue the loose ends! And your beaded flower spray is done.
Beaded flower tutorial 7
Beaded Flowers tutorial 
This beaded flower tutorial  is a super easy version ! If you have a bit more time you can try the Beaded flower tutorial  or the Beaded tree tutorial .
Beaded flower tutorial 3
Beaded Flowers tutorial 
I hope you enjoyed this crazily simple tutorial and do bear with me on my first attempt at watercoloring an image [I was super glad baby was a baldy and I didn't need to color hair ...not yet ready for hair days!! Ha Ha]

Supplies:Dies : Spellbinders Majestic Labels 25, Wild rose studio floral frame, Marianne Anja leaves 3,Lifestyle crafts Bow,Couture creations Oval, Cheery Lynn  Sunflower die.Embellishments: Jesse James buttons , Baby bottle charm
Linking to Kraftzone Sep
Edited: this project was winner at Kraftzone Welcome Baby theme
It was also featured at Totally Tutorials

quarta-feira, 9 de julho de 2014

Swinging Card Tutorial #crafts #diyprojects #homerenovacion #remodeling #homeimprovement #renovation #diy @verefazer


Swinging Card 8
Swinging Card
      Dear friends this interactive swinging card is my Guest DT post for  Digital Delights  for winning the Petal Power challenge with my Mother’s Day Card.
         Delightful challenges holds a very special place in my heart as I won my first Guest DT post ever [back in 2011] with  this Quilled Sunflower Girl…I was so nervous when I used their digital image [ first time I worked with digis ]  in a Side step pop up card which was my first guest DT post and that card in turn won me a Guest DT at  Crafty JC ! 
        I have done numerous Guest DT posts since then for various websites and craft shops but believe me I still get super nervous as to how a Guest Post will be received!I hope you guys enjoy this Easy to make Swinging card and tutorial
Swinging Card 9
Swinging Card
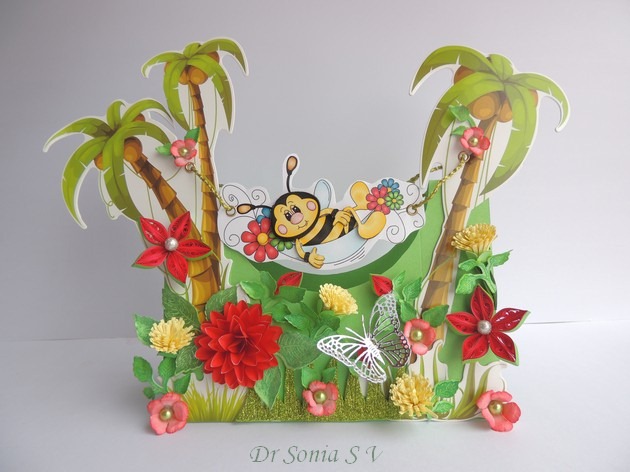
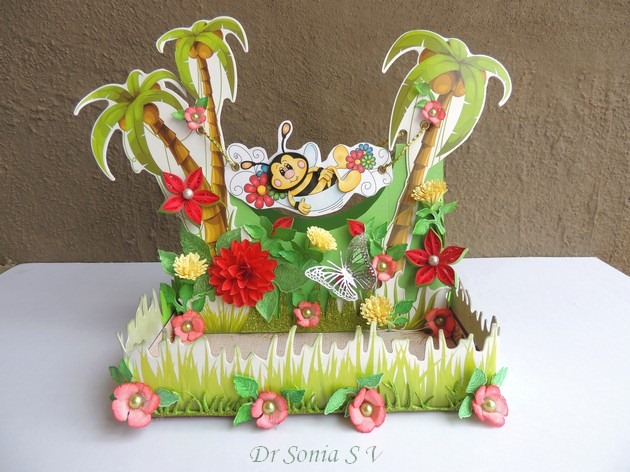
         I used the super cute digital image "Relax Barnaby" from Digital Delights, 3D decoupaged him and suspended his hammock from palm trees in this tropical paradise themed swinging interactive card.
Swinging Card 10
Swinging Card
       My daughter is forever searching for her eraser and pencil sharpener during homework time and I had been intending to make a  tray to hold her stationary...so I placed my interactive tent card on a cardboard box lid dressed up with glitter foam grass and handmade flowers.
Swinging Card 5
Handmade flowers
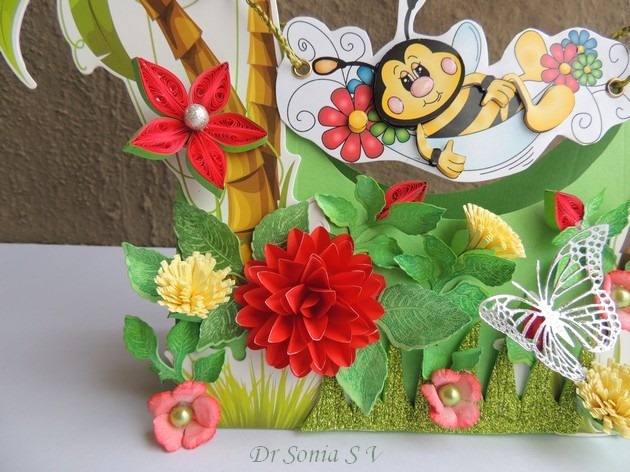
What is paradise without some flowers so added some quilled flowers and stamped leaves to my tent card.
Swinging Card 6
Handmade flowers
I always make my own flowers and the large red flower is also handmade and here is the tutorial link : Easy Flower tutorial 

Sharing How to make a Swinging Card

Material required
Cardstock - any size will do but I used an A 4 and a 6 x 8 inch piece of card stock
Glue- I used Fevicol MR 
Scissors
Something to cut an aperture
To punch holes- single hole punch  or crop a dile
Twine, thread or ribbon to suspend your image
Optional - Scoring board, Eyelets and eyelet setter / crop a dile

Swinging Card tutorial  1
Swinging Card Tutorial
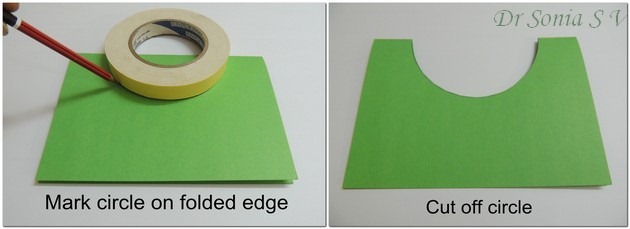
         On the folded edge of an A 4 card mark a semicircle  using a template [ use anything you have like a plate, lid, circle die,or even a  foam tape like I used here]-- just make sure you leave 1 1/2 - 2 inches on either side so that your card remains sturdy! 
         Cut out a semi circle ,oval, square or rectangle aperture [ the aperture can be any shape you fancy!] on the folded edge cutting through both halves of your A 4 card
Swinging Card tutorial  2
Swinging Card Tutorial
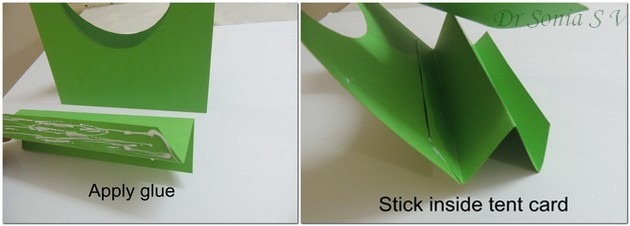
            As an interactive card is going to be played with quite a bit  you need a good sturdy base so that it doesn't topple over! I chose a 6 x 8 inch card [ you can play with measurements] and  folded it in half [ center mountain fold] and then folded up [valley fold]1 inch on either side to get an accordion fold in the shape of a  " W ".
If you have a scoring board :score on the 6 inch side at  1 , 3 and  5 inch marks.
Swinging Card tutorial  3
Swinging Card Tutorial
        The 1 inch folded parts of your accordion folded " W "are your gluing tabs.Apply glue to one gluing tab of the " w " as shown and stick it inside the tent card you had already made.Apply enough glue and pressure as its important to get a good adhesion here.
Swinging Card tutorial  4
Swinging Card Tutorial
          Fold your " W " accordion and apply glue on the other gluing tab and firmly stick the other flap of your tent card onto it. The tent card on which your swinging element is going to be hung is ready!
Swinging Card 2
Swinging Card Tutorial
           On either side of  your aperture ,add decorative elements such as trees, vines ,lattices or whatever element fits in with the theme of your card.You can allow it to jut above the folded edge of your card just dont embellish the top of  your tent card heavily
Swinging Card 7
3 D Decoupaged image
          As a swinging element I 3 D decoupaged the cute honey bee by cutting him and layering using foam dots. Can you see the shiny flower centers and shiny nose and cheeks of the cute bee ? [ courtesy glossy accents] You can choose any swinging style image like a child on a swing  or a  hammock , a bird on a branch etc.Punch holes on either side and attach to the tent card with twine, thread or ribbon. 
Swinging Card 11
Swinging card
       You can actually make the image fit right inside the aperture so that it swings freely to and fro . Since  both my clinic and home renovation printers were acting crazy I had to depend on a printing shop to print  my digital image and I couldn't get my image size a perfect fit but my little bee still swings happily !
Swinging Card  13
Swinging card
Another tip : Do heavily embellish the base of the card like I have done with flowers galore or whatever  you fancy and keep the top relatively simple as otherwise your card will topple over!
You can also decorate both sides of your swinging card like I did in Spinning card tutorial 1 and Spinning card tutorial 2

I hope you like this interactive card which actually doesn't require any fancy tools to make.

Supplies : Spellbinder Classic Leaf ,Spellbinder Rose creations,Cheery Lynn Butterfly,Memory Box fringe, Cheery Lynn Grass,

Linking to  Deep Ocean Challenge Fav 2014 Card
Edited : This card came top 3 in Digi Sketch In the garden theme
Top 3
This swinging card also came Top 3 at BGC Kiddish theme
Beyond Grey Challenges

Advertisement

Related Posts Plugin for WordPress, Blogger...