RANDOM POSTS
Mostrando postagens com marcador Recycling Craft. Mostrar todas as postagens

quinta-feira, 12 de outubro de 2017

Altered Pen-stand and Card Set #crafts #diyprojects #homerenovacion #remodeling #homeimprovement #renovation #diy @verefazer

Altered Pen Stand
 Hi friends.....I somehow just love making pen stands! Not only are they  super useful but they offer an opportunity for recycling as well! This one too like the one in the previous Napkin Decoupage Tutorial post was made by recycling a metal tin.
I made a garden with cheerful handmade yellow chrysanthemums, sparkling magnolias  , hanging vines and a cute bunny.
Altered Pen Stand
The background is a bright cheerful yellow honeycomb pattern paper and to make it even more cheerful and happy I added cute fluffy dangling pompoms all around !
Altered Pen Stand
My garden has a gorgeous felt bicycle and a huge smiley felt flower both of which are gifts from my  blogger pal Priyanka Mathur
Altered Pen Stand
Sunny yellow is such a cheerful color isnt it and I hope my pen stand makes you smile!
I also made a matching card in bright yellow featuring a felt house and handmade magnolias.
Handmade Magnolias Card
I didn't have the same pattern paper I used to make the pen-stand but could recreate the honeycomb background pattern using ink pads and a honeycomb stencil .To my surprise and delight even the size of the honeycombs in the card and the pen stand turned out the same!
Stenciling
I find participating in Challenges fun as I get to venture out of my comfort zone and experiment! Tried the  smooshing technique by  spraying paints on my craft mat and smoooooshing the die-cut "cheers".
3 D Layering
I must admit I was not too happy with how it turned out ...a bit too artsy looking !! I  have tried to salvage it by layering it over 2 more "cheers" and making it  3 D. What do you say my friends.....?

Supplies used to make the  Pen Stand : Dies :  Magnolia DooHickeys Lovely Fence, Spellbinders Magnolia, Cheery Lynn Chrysanthemum Strip,Cheery Lynn  Rose Leaf Strip, Cheery Lynn Grass Border ,Poppystamps Weeping Willow Branches
Stamp and Die Sets : Heartfelt Creations Woodsy Critters - rabbit, Sizzix Framelits Die set 5 with Hero Arts Stamp Butterflies 3 No 657773

Supplies used to make the Card
Dies : Winnie and Walter  Essentials Audrey Cutaways ,Winnie and Walter Cheers Cutaway ,Spellbinders Magnolia,Spellbinders Delicate Doilies,Cheery Lynn  Rose Leaf Strip.

Linking the Card to 
Simon Says Stamp Wednesday Challenge 
SimonSays Stamp World Cardmaking day
WCMD 2017 Background Building/Pattern Making Challenge with Mayuri - made the background with a stencil and ink pads
WCMD 2017 Lovely Layers Challenge with Keren
Winnie and Walter Rerun 24 Our Town - inspired by the house with green foliage in Lydia's card
WCMD 2017 Smooshing Challenge with Lydia


quarta-feira, 11 de outubro de 2017

Napkin Decoupage Ideas and Tutorial #crafts #diyprojects #homerenovacion #remodeling #homeimprovement #renovation #diy @verefazer

Napkin Decoupaged Projects
        Hi friends, I am sure many of you have seen gorgeous projects with textured decoupage...I especially love the projects where crafters decoupage on rope to give a ridged texture effect.
I usually don't have the patience for decoupage but I wanted to use this doggy themed tissue paper which I had picked up from the dollar store during my visit to the US last year and so came up with some fun easy ideas.
Napkin Decoupaged Box
This is a cardboard box recycled and given a second life  with the gorgeous puppies themed napkin.
Parchment Flowers
I love the delicate look of parchment/ vellum and so added quite a few parchment flowers made by heat embossing and die cutting the Heartfelt creations  Sun kissed fleur stamps - die set.
Napkin Decoupaged
The whole box was lined with corrugated white paper before decoupaging and that is the secret to the textured decoupaging!!He-he yes it's the lazy crafter 's route to decoupaging!!
Napkin Decoupage Tutorial 
My tissue papers which are from the dollar store were not the typical 3 ply[ has 3 layers] but 2 ply and so had only 2 layers.
Napkin Decoupage Tutorial 
Whenever you are decoupaging with napkins...remove all the layers except the top design layer...otherwise you can end up with a mess while decoupaging.
Napkin Decoupage Tutorial

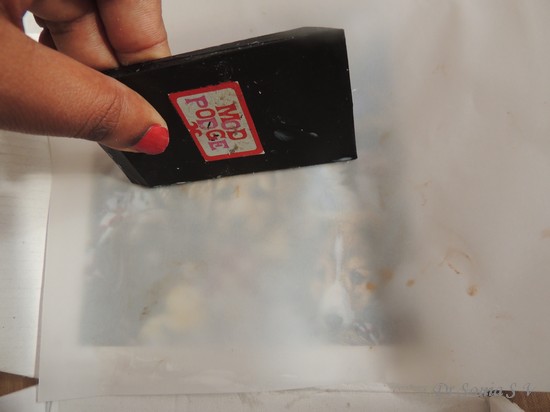
My favorite decoupage glue is Mod Podge as I find it has the best consistency and is the easiest to use. You can use either a paint brush or a foam brush to apply the Modpodge...I hate the waste which the foam brush inevitably produces so almost always use a paint brush...just remember to wash your brush immediately after use [ or if you are lazy like me just dunk it into a jar of water till you can tear yourself away from the project you are working on!]

Napkin Decoupage Tutorial 
Now the trick to getting textured decoupage effect without going to a lot of trouble...apply modpodge on the corrugated base, lay your tissue paper on top and use a squeegee or something similar to gently glue your tissue paper into the ridges.

Napkin Decoupage Tutorial 
If you have an impatient nature/ rough hands...here is an easier way....lay a sheet of parchment paper on top of the napkin and ease it into the ridges of the corrugated paper!

Napkin Decoupage Tutorial 
I hope you can see the lovely ridges!

Napkin Decoupage Tutorial 
Patiently allow time to dry and finally apply 2 or more coats of mododge over the napkin again allowing enough time to dry. Varnishing is optional.

Decoupaged Box
My set has a pen-stand made by recycling this metal tin salvaged from the operation theater!
Napkin Decoupage Tutorial 

Tip: A white base is the best for napkin decoupaging as it brings out the design of the tissue paper best. You can use gesso if you plan to add more artistic flair or directly apply white acrylic paint/chalk paint.
Napkin Decoupage Tutorial 
I didnt add corrugated paper but simply brushed a coat of mod pode and stuck the napkin.
Altered Tin

Those puppies look adorable dont they?
Altered Bottle
I went all crazy with metallic pearl paints on this bottle and that is why the decoupaging looks a bit dark...in retrospect I think a white base would have been better.
Napkin Decoupage 
The bright parchment flowers with their huge button centers on the neck of the bottle are the cheerful elements!
Altered Bottle with Parchment Flowers
Lastly being first and foremost a card maker at heart...I just had to make a simple CAS card with the gorgeous tissue paper!
Napkin Decoupaged Card
This one was made by decoupaging the tissue paper on corrugated paper and then matting on card stock.
I hope you liked these easy  napkin decoupage projects.

quinta-feira, 28 de setembro de 2017

Handmade Bird house #crafts #diyprojects #homerenovacion #remodeling #homeimprovement #renovation #diy @verefazer

Graphic 45 Birdhouse
Hi friends sharing a 3 D birdhouse I made using Crealies dies and gorgeous Graphic 45 papers with a bit of recycling thrown in.
Birdhouse
         I used the same Crealies dies to make birdhouse Tealight holders earlier this month [link here : Teacher's Day Gifts] and loved the projects so much I decided to give another twist to it! This is a fall themed home renovation decor idea with mushrooms, flowers, pearls and flowers galore. A little birdie perching on a tiny branch is peeking out of her home!
Birdhouse
This project has feathers, natural dried pollen,gorgeous berries ,  fabric leaves and a bronze mushroom. Here is how I made the stand and base for the birdhouse:
Cardboard recycling
I recycled a cardboard tube [ the inside of a roll of bandage] by wrapping it with Graphic 45 paper and used it to form a stand for the birdhouse.
CD recycling
Recycled a CD to form a sturdy base for the bird house. Layered discs of foam, cardboard and pattern paper to give extra height and strength to the base .To give some more height also added the cardboard tube leftover from foam tape under the CD
Birdhouse
The little garden on the base of the birdhouse has Sospeso Trasparente flowers, puffy fabric flowers, mushrooms, butterflies and birds! The tiny butterfly and hummingbird are popped up on acetate so they appear to literally fly!!
Sospeso Trasparente flowers
The shining white flowers winding around the stand above and the shimmering orange daisy you see below plus the shiny leaves are all made using the Italian art form Sospeso Trasparente [ you can read about it here : Sospeso Trasparente explained]
Sospeso Trasparente 
I used Crealies dies and scraps of Graphic 45 papers to make the birds . It is so satisfying not to waste even the tiniest bit of your favorite paper! The shimmering white feathers you can see peeking from places were also made using Crealies dies.
Birdhouse
The shiny butterfly disc was  made from a scrap of Graphic 45 paper and a glass cabochon!
Birdhouse
And that is how the birdhouse looks on our terrace garden.I hope you liked this idea.

Supplies : Dies :  Crealies dies : Crealies Create a Box -13 Birdhouse, Crealies Double Fun[34]-Feathers,Crealies Double Fun-33 Birds,
Cheery Lynn  Mini butterflies with Angel wings,Cheery Lynn tiny things with wings,Cheery Lynn Sunflower,Cheery Lynn  Flourish 13,Memory Box Fringe Border,Wild Rose Studio Floral Frame,Provocraft Circles Die,Dienamics [MFT] Stitched Circle Scallop Frame
Papers : Graphic 45 Time to flourish ,Graphic 45 Time to Celebrate ,Graphic 45 Nature Sketchbook

domingo, 17 de setembro de 2017

Altered Penstand #crafts #diyprojects #homerenovacion #remodeling #homeimprovement #renovation #diy @verefazer

Altered Penstand
Hi friends sharing one more fall themed project which I made for my craft table. Recycling makes me feel good and it was heartening  to give new life to a broken old nut cutter!
Recycling Craft
My favorite way to use pretty paper is to make 3 d projects for the home renovation and I used gorgeous Graphic 45 papers to line the inside and outside of this multipurpose holder.
Altered Penstand
The  cups  were made using an Elizabeth Craft Designs Teacup die set on foam , gold metallic paper and Graphic 45 Papers
Altered Penstand
I couldn't resist adding a smiley flower !
Altered Penstand
All the flowers on this project were made using  punches and dies . The filler flowers are my current favorite and were cut with Elizabeth Craft Designs dies.
Altered Penstand
And here is the altered stand with my water-brushes, scissors and paper-cutter!
Altered Penstand

Hope you liked this project!

Supplies : Dies :  Cheery Lynn  Flourish 13 ,Cheery Lynn Sunflower, Spellbinders Magnolia ,Elizabeth Craft Designs Teacup,Elizabeth Craft Designs 728 Bunch of Flowers
Papers : Graphic 45 Time to Flourish , Graphic 45 Time to  Celebrate
Linking to  

quarta-feira, 13 de setembro de 2017

do it yourself web diyRemote Holder Tutorial #crafts #diyprojects #homerenovacion #remodeling #homeimprovement #renovation #diy @verefazer

do it yourself web diyRemote Holder 
         Hi friends have you ever had to solve "The case of the Missing Remote" ? Hehe it is such a frequent occurrence in my home renovation with each family member ending up playing detective and the hunt at times  lasting excruciating hours!
do it yourself web diyRemote Holder Tutorial 
After one last episode of having to go excavating under the cushions and crawling on the floor in search of an elusive remote.... I decided enough was enough!
And here is How to make a Remote  / General purpose Holder!! 

Materials Required

  • Cardboard or Chipboard - I recycled old desktop calendars !
  • Pattern Paper-Use good quality pattern paper
  • Strips of Card stock 1 inch wide - to join the cardboard pieces
  • Liquid Adhesive-more reliable than tapes and glue gun 
  • Thick Foam- to form the base and line the inside
  • Decoupage Glue- Mod Podge

I measured the height of our tallest remote and the width and worked out a design.
do it yourself web diyRemote Holder Tutorial 
The picture above shows the shapes of the cardboard pieces and their dimensions. The exact dimensions will actually depend on the thickness of the cardboard/chipboard pieces you are using.
If you want to make a really sturdy project....use double layers of cardboard/chipboard on the front and back .
do it yourself web diyRemote Holder Tutorial 
If you want to create a functional and sturdy 3 D paper craft project the best way to glue the parts is to use strips of card stock with liquid adhesive. If the climate in your country fluctuates widely , red tacky tape and hot glue [from the glue gun] are not reliable.
do it yourself web diyRemote Holder Tutorial 
After sticking the outer parts...decide the position of the inner dividers. I have spaced the inside at 1 and 3/4th inch apart so that there is enough room and the remote can rest comfortably at a slant and be easily removed and put back.
do it yourself web diyRemote Holder Tutorial  
Line the inner walls with pattern paper and add a piece of thick foam on the outer and inner parts of the base . The inner foam lining will help to form a soft cushion for the remotes to rest on .I added a piece of foam on the outside base too as foam is waterproof and will help the remote holder to withstand the inevitable spillages on our table!
do it yourself web diyRemote Holder 
Cover the dividers with pattern paper too and stick inside onto the foam base and pattern paper lined walls. Since you are not using card stock strips to help adhere the pieces but applying glue directly to the edges, you have to be a bit patient and hold the pieces in place as the wet glue dries.
do it yourself web diyRemote Holder 
To make the project durable, add a nice coat of a sealant decoupage glue such as Mod podge.
do it yourself web diyRemote Holder 
Since this is going to be a functional project subject to everyday rough handling, don't add embellishments but use it as a chance to showcase the prettiest papers you have ...which in my case are the fabulous papers from Graphic 45 Nature Sketch book
do it yourself web diyRemote Holder 
So how do you like this functional project my friends...?
      And you may be wondering....has that solved the issue of our remotes going amiss..?Well the remotes seem to like their new home renovation better than the dark recesses under the sofa and only wander off occasionally when they feel they have to give myself or my hubby some exercise !!
Linking to
Word Art Wednesday 300- 301
CraftyHazelnut's Pattern Paper Challenge
All Sorts Challenge - Used 2 different papers from the Graphic 45 Nature Sketchbook- one on the outside and one the divers and one on the inner lining walls.

Advertisement

Related Posts Plugin for WordPress, Blogger...