RANDOM POSTS
Mostrando postagens com marcador Post it note holder. Mostrar todas as postagens

sexta-feira, 23 de agosto de 2013

How to recycle CD cases #crafts #diyprojects #homerenovacion #remodeling #homeimprovement #renovation #diy @verefazer

CD Case recycling
Here is the promised mini tutorial on how to recycle CD cases into notebook holders [this years Teachers Day gifts]. 
Since I am a big fan of recycling crafts I am always on the look out for recycling ideas..I'd seen DVD case notebooks and post it note holders but googling up instructions for how to recycle CD cases specifically yielded nothing much so sharing how we went about recycling CD cases.
CD Case notebook
To make note book holders like I have shared in this post on Teachers day gifts you need a CD case which has a bit of room inside it.I found  2 types of CD cases with enough depth to hold a notebook -
1.opaque black plastic type
2. transparent glass look type 
The  glass type does  not have very sturdy hinges and one broke while I was embellishing it so I would urge you to try out the hinges before you embark on recycling it.
Embellishing the glass type is a bit different and in this post I'll share on how to recycle the opaque plastic CD cases
CD case recycling
1.Test the hinges -discard those that look suspiciously likely to fall apart!!
2.Check the inside and use a craft knife /scissors to cut off protruding center of plastic from the inside as shown in the pic above .
CD Case recycling
3.No need to chop off all the protruding bits of plastic from the inside-just the center is enough![see pic above-I have left the rim in the 2nd half of the collage]
CD case recycling
4.If the inside has a bit of bumpy surface use card stock[thick paper] to line it otherwise thin paper will look unsightly and tear too!.Double sided tape [not foam tape] is the easiest adhesive I found for this .
Washi lovers can have a ball too as washi /fabric tape is great to deck up plastic surfaces [as shared in this post on Recycling with washi]Thank you Priya for sending me the yummy Washi.
5.Choose a notebook /Post it notepad which is not too bulky and will let your CD case close without much mishap!!
CD case recycling
6.In the collage above you can see my little crafter covering the notepad with pattern paper she had chosen and matching die cuts.
CD Case recycling
7.Once your notebook is ready adhere it to the inside of your CD case.We used double sided tape again [I love this adhesive-so quick, easy and mess free especially important factors while crafting with kids]
CD Case recycling
8.Embellish the front of your CD case and you are done! We used double sided tape to help stick pattern paper on the cover of our recycled CD case
CD Case recycling
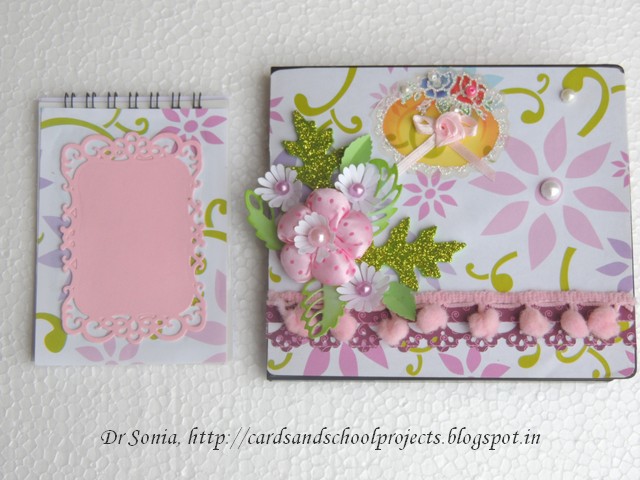
Added stickers[a gift from Priya Sondhi--Thank you Priya],fabric flowers, punched flowers and some die cut foam and paper leaves on our recycled CD case.
CD Case recycling
In another variation , added chip board  embellishes ,pearls and rhinestones to make a simpler CD case notebook
CD Case recycling
Here is a closeup of the gorgeous shimmery glittery chipboard embellishes which are a gift from the awesome generous Shalini of Crafters corner
CD Case recycling
I hope I have you with me till now. So that's 3 down on my list of Teachers Day gifts!! 7 more to go..wish me luck!!!
My husband had suggested making minialbums with the CD cases but the thought of making 10 albums for Teachers Day was too scary for me.Need input from you guys about experience with mini album making--how much time would a basic one entail ?
This tutorial was featured on Totally Tutorials

sábado, 29 de setembro de 2012

Waterfall Card tutorial -from a single A 4

Waterfall Card and Post it note holder
Waterfall Card
Waterfall cards are super fun interactive cards and recently I made quite a few with matching post it note holders.The photos show the flipping panels of our waterfall card.
Waterfall Card
Waterfall Card
 I had fun using butterfly stickers on the 2 inch square flipping panels of this waterfall card.


Waterfall Card
The photo shows the matching 3 x 3 inch  pen with post it note holder.
Post it note holder
Post it note holder

Waterfall card tutorial

Though I love making all kinds of interactive cards ,waterfall cards seemed complicated.I couldnt quite understand  the tutorials on the net and I  couldn't even fathom the name waterfall as the panels actually flip up on pulling the tab [how crazy it would be if a waterfall defied gravity like that!].Also the tutorials on the net seemed to require a lot of card stock!
As paper-crafters we all love to "save" our precious card stock don't we? So the fun "paper saving" aspect about this tutorial is you can make a waterfall card using just a single sheet of A 4 card-stock and once you get the hang of it ,it saves time too!

What is a waterfall card?

For my crafting friends who are not familiar with a waterfall card its a beautiful interactive card which looks way more complicated than it is!!
The waterfall mechanism needs 4 paper parts
1.Base card
2.Interactive strip
3.Flipping Card Panels
4.Restraining Belt strip
Stick card panels on to a folded card strip and your waterfall strip is ready. Use a belt type card strip to anchor it to a card base and your waterfall is ready to flip!
To cut these waterfall card parts from an A 4 card

  1. Cut off 2 inches from one end of an A 4 strip-gives the panel strip
  2. Cut off 1.75 inches of the remaining piece as shown- gives the interactive strip
  3. Cut off 8.5 inches of the last piece- gives the base card and the belt

Waterfall card Tutorial
For those who love measurements [Base card: 8.5 x 6.5 which when folded is 4.25 x 6.5 ; Interactive strip:1.75 x approx 9.5;Panel strip:8.25 x 2 which when cut gives 3 panels of 2 x 2 inch and one panel 2.25 x 2 inch;Belt strip 6.5 x 1 and 1/8th which should be trimmed to 4.25 length]

Waterfall card Tutorial
Score and fold the interactive strip .Cut the panel strip into 4 panels at approx 2 inch intervals[the Panel strip is 8.25 x 2 which when cut gives 3 panels of 2 x 2 inch and one last panel 2.25 x 2 inch..if you want you can shorten this odd one to 2 x 2 or leave it as such ].By this method you utilize just one A 4 card to make the waterfall and only waste a small strip of card marked "cut off" from the belt strip.
Waterfall card Tutorial
Take the interactive strip [9.5 x 1.75 inches] and score at 2 inches,2.75,3.5 and 4.25 [ie 0.75 inches gap]. Fold both ways at the creases to loosen the score lines. Fold over the strip as shown[ at the last score line towards the center of the strip].
Waterfall card Tutorial
Apply glue on the 2 inch wide area of the interactive strip as shown.Glue one card panel [I choose my odd size one which is longer than the rest] on it aligning the top of the panel to the score line.
Waterfall card Tutorial
Apply glue to the area before the next score line and glue on the next panel again aligning the top of the panel with the scoreline.Similarly glue on the other 2 panels of the waterfall card.

Waterfall card Tutorial
Now you have your folded waterfall mechanism with the overlapping panels stuck on, the folded base card and the belt strip which you have cut short to a length of 4.25[ the width of your folded base card]
Waterfall card Tutorial
Attach the belt strip to the lower part of your base card using strong white glue at the edges[ around 0.5 inches area] or brads or eyelets.The belt attachment needs to be sturdy yet loose to allow easy flipping of your waterfall  card.
Waterfall card Tutorial
Slip in the folded waterfall strip under the belt keeping the part with the panels above the belt. Apply glue on the central part of the strip which will be covered by the panels.Stick on the panel which overlaps the belt aligning the lower border of the panel to the lower border of the belt.Allow it to dry well and pull the interactive strip to see your flipping waterfall card.
Waterfall Card
Waterfall Card
Well for those of you who have never made a  water falI card it may sound complicated..but do give it a shot and I bet you will be hooked ! And I  do hope this crazy tutorial is of help..to my fellow crafters in some way.
Here are some more waterfall cards

terça-feira, 11 de setembro de 2012

Teachers day cards and Blog Hop Winner #crafts #diyprojects #homerenovacion #remodeling #homeimprovement #renovation #diy @verefazer

Teacher's day cards
Teachers day cards
I love making cards with all kinds of interactive movements such as spinning cards, swinging cards, pop up cards, sliding cards,wiper cards,shaker cards and crazy cards with combinations of all these mechanisms.
Teacher's day cards- waterfall card
We combined a waterfall card with a simple pop up mechanism in this teacher's day card.
Teacher's day cards 
You would have guessed who chose all the stickers on this teachers day card [I am actually glad my 6 year old chose " hello kitty" than Disney princesses this time- I am suffering from an overdose of sleeping beauty these days!].I made a punchcraft rose to embellish a matching post it note holder.
Post it note holder
These post it note holders are completely inspired by my blogger friend Nupur though I did have to scratch my head to figure out how to make them.
Post it note holder
Also Sharing in this post the winner of the first candy I am giving away on my blog [For My dear friend Beckie's blogversary hop]
Its .....
Jessica S 
from  http://jessicascraftshaque.blogspot.in/ in the USA!
Its quite amazing since I won my first ever blog candy from her and she is the winner of the first candy at my blog!
Here is what I will be sending her.
Blog candy
It includes a Peacock emboss painting kit,Flower and beads mobile making kit, Quilling kit, Finger puppet making kit,Puffy Fabric flowers, 6 little Dolls ,Peacock embellishment and rhinestones. I must confess when I realised Jessica was the winner I tweaked the gifts to include the emboss painting[for an Indian touch as its our national bird] and the finger puppets[ Jessica has 5 darling children]! I hope she likes it!!

Interested in card making ? Here is a compilation of nearly 30 card making tutorials

Advertisement

Related Posts Plugin for WordPress, Blogger...