Hi friends.. so happy to share a project which is very special as it is the biggest handcrafted project I have ever made till date and one which took the longest time and dedication to perfect!
It all started when I was sent this gorgeous Wooden Carved Door in my DT kit for Crafters Corner and my daughter asked me if I could make her a doll house using it!
When I told her "yes" I had no idea what I was getting into! She had very clear demands that the house had to be huge enough for her "Barbies" and Wonder Woman doll and that there should be doors than open and a balcony! And of course I had to make it strong enough for her to play with!
My daughter just loves Graphic 45 papers and so I really went to town in this project using gorgeous papers from
A Lady's Diary and Gilded Lily...both perfect for the theme!
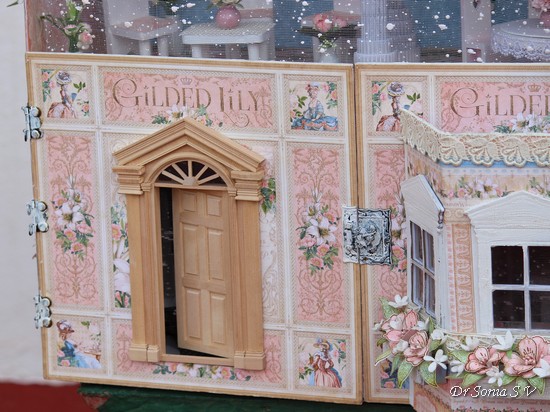
The House is 24 inches wide and the door and window frame are 12 x 12 inch and are attached to the walls with 3 sets of metal hinges and held closed by a special metal lock in the middle.
The house was designed to allow the beautiful door to fully open inwards and the dolls can actually enter through it! The
bay window is my favorite part of the house and the one part which was the toughest to make!
The bay window has a triad of windows each fitted with glass[ acetate] and having its own flower bed
Tip : If you are using hot glue in flower making...take a few minutes extra to pull off the glue strings as you go otherwise your project will have unsightly stringy elements!
The windows were made with several layers of foam, chipboard and cardstock and after painting with gesso given a nice coat of Finnabair White Crackle texture paste .
Though this step added greatly to the project time...I love how it adds so much beauty!
The Bay window has a separate floor and roof. The roof is made from chipboard and is sturdy enough to hold flower pots and for toy pets to stroll in and sunbathe !
This is how the inner part of the Bay window looks like...it has a recessed alcove which has a sturdy floor and you can place some furniture inside for the dolls! The cute curtain was made by my daughter using scrap fabric from her dress[ the same one she is wearing in the video]She threaded the lacey material through a chopstick and I helped hot glue 2 large pearls to complete the curtain rail!
The Window frame is attached to the side walls with 3 metal hinges and brads and swings open easily
Tip : Use really long brads to help hold the hinges on the thick chipboard. Gesso over the metal elements to blend in more with your project depending on your theme.
The sides of the house were decoupaged with beautiful Graphic 45 papers and I have framed beautiful images from "Graphic 45 A gilded Lily" inside each window.
I was so happy to frame these images as they are actually scraps from an earlier project here :
Graphic 45 Desk OrganizerTip : Make your own filler flowers from foamiran! I used Elizabeth Craft Designs dies to die cut dozens of tiny flowers from white foamiran.
Just heat the flowers for seconds and the petals will curl beautifully without you having to spend hours shaping them with tools !
Wire pollen is also pretty useful to save time while making a bunch of filler flowers quickly.
Dress My Craft Sparkling dust and
Microsparkling dust were used to give a subtle shimmer to all the flowers and leaves.
This was such a mammoth project and took me nearly 3 weeks to make! There were so many steps involved and a good part went into planning, measuring, cutting and gluing. I wont bore you with all the little details but yes I will run you through the main steps.
The gorgeous wooden door is pretty large and actually opens like a real door. Use 2- 3 layers of chipboard to create a sturdy frame for the door. I used 1600g thick black chipboard and just to be extra sure backed it with a 2mm thick chipboard to make it super sturdy.
The door has a protruding part on it's back ... mark out this dimension onto your chipboard
Cut out the aperture and sand the edges
Check the fitting of the door inside your frame...it should be snugly fitting...not too loose. Keep it aside for now. Only fit in the door after gluing your pattern paper.
To make the bay window- cut 3 pieces of chipboard - keep the central one wider than the other 2.Glue the pieces in shape at an angle .
Make a chipboard floor and roof for your gable window also. Stick this to a 12 x 12 chipboard from which you have cut out a large square- this is completely optional and just makes your work more but it is so cool when you have a window seat in an alcove just like in real houses!
Tip: To make your windows nice and realistic - use several layers such as chipboard , foam and card stock. Using foam layers give thickness without adding to the weight and using chipboard makes it sturdy.Also add acetate to your windows for a lovely glass effect!
After gluing on pattern paper[ from Graphic 45]...add the windows.
Since my doll house was going to be put to use rather than be a mere showcase item I was rather obsessed that it should be very sturdy.....so I coaxed my husband to cut some scrap plywood pieces to make the Doll house floor and back wall. In retrospect I think I should have used chipboard as it was so difficult to glue the thin wooden planks together!
In the end we used a thin block of wood to hold the 2 wooden planks in place using nails and glue!
The main side walls and divider walls are chipboard and were glued using wet glue and masking tape .
Tip : When making 3 D projects : Don't be tempted to use hot glue in areas requiring good permanent adhesion!
The roof needs to be light so you can make it out of cardboard. I used the package of my Aquaguard water purifier ...cut it into 3 equal segments and glued the edges in a triangular prism!
Glue it onto the house and your basic frame work is done!
You can take the easy way out and keep the roof simple or be crazy like me and spend hours cutting corrugated paper into squares and then go the even more crazier perfectionist route and spend more hours rounding off the corners of each square to make "tiles"
For a perfect tiled roof look one has to curve the tiles and glue them...which can be really tricky if you are using wet glue and a smooth surface. The best way is to line your cardboard roof with foam sheets and then hot glue the corrugated paper tiles one at a time...going slow and steady and taking care to pull off the glue strings every now and then!
I spray painted the roof silver and then sprayed adhesive and gave a generous sprinkling of Dress My Craft Microfine Glitter [ hard to see the shimmer in the photos]
The roof is rather special and has a secret room in the attic!
I made a triangular closure for both sides of the roof and it can be pulled down to reveal the secret room!...My daughter was especially thrilled with this!
A large fabric net is attached via magnets to the roof of the house and you can either fold over this fabric to see the inside or remove it and keep aside.
 |
|
The inside of the house is completed lined with Graphic 45 papers!
My daughter helped to paint some of her old wooden toy furniture pieces [ they were originally wood color but quite old and worn out looking]
The little teapoy has a pearl table mat and a cute flowervase. I even dressed up some of the chairs with Graphic 45 papers!
The flower vases have thread pollen and cute roses
The pillars were handmade by rolling and gluing together different lengths of corrugated paper !
They turned out really cute!
I used papers from Graphic 45 on all the walls and the floor choosing contrasting yet complementary colors and patterns--- which is quite easy if you choose your paper packs wisely.
This side has tiny wooden chairs and a cute oval table ...I used toy furniture my daughter had but do check out the gorgeous miniatures at Crafters Corner!
The framed pictures were made using Sakura Air drying clay---- which in my opinion is the best clay to use with molds.
I used up saved scraps of Graphic 45 paper to make the frames. The lily images are actually from the front cover of the paper pack!
The cute oval table was dressed up with a foam mat and gorgeous white lace .Now let us go to the lower storey. Here you can see the inner side of the gorgeous door.
The first room has an armchair and tea, donuts and biscuit laid out!
The biscuit was made out of air-drying clay and a chocolate mould and the doughnut was made freehand by my daughter!The doughnut even has glace icing which my kiddo achieved by applying a thin layer of watered down glue!
Do you like the cute glass kettle---hehe I love it too as I made it at home renovation using resin and a choocolate mold!
The 2nd room is a dressing room and has lace curtains[ again cut from my daughter's dress!] and a wooden cupboard.
The glass slippers, the pink heart, the bows, the little crown and the winged heart were all made using either clay or resin and moulds! And there is a pearl mat befitting royalty!
 |
| Resin Glass slippers |
My daughter just loves the glass slippers ! In fact she helped me make them using resin and chocolate mold. We were able to achieve that pale pink glass look by adding a few drops of alcohol ink to the resin before it set.
The cute sparkling heart was made using Sakura clay and made to sparkle with fine rainbow glitter[from Dress My Craft ]!
This room is my daughter's favorite . An old wooden table was rejuvenated with gesso, paint and a lovely lace trim. And we added super cute porcelain tea set I picked up especially for this project from Crafters Corner when I visited Delhi for the Crafty feast!Phew I hope you didnt fall asleep...It was a lot of hard work but I felt so happy when my daughter claimed that this is her best birthday present ever!!!
The list of supplies is huge and in case you need further information please leave a comment.
Wooden Carved DoorAdhesives : E6000 Spray, Elmer's Craft Bond, Aleene's Tacky Glue, Red Tacky Tape, Hot Glue Gun, Mod Podge MattePapers and Chipboard: Dress My Craft Floral Exotica, Corrugated Paper, Graphic 45 A Lady's Diary, A Gilded Lily, Acetate, ChipboardFabric : Lace - Vintage Lace white 5MagnetsFlower Making : Foamiran Sheets- WhitePollen : Pastel Thread Pollen, White Wired Pollen, Pointed Thread Pollen Light GreenScissors : Tonic Tim Holtz 7 inch, Tonic 9.5 inch, Micro Serrated MiniDies : Heartfelt creations Sunrise Lily,Elizabeth Craft Designs 728 Bunch of Flowers ,Sizzix Tim Holtz Window & Window Box,Sizzix Tim Holtz PedimentsStamps : Heartfelt creations Sunrise Lily ,Tools : Groove Golf Tool Set, Squeegee and Mod Podge Tool Kit, Funnel Tray, Cropadile Big BiteMiniatures : Miniature Flower Pots, Miniature Porcelain Tea SetGlitter : Dress My Craft Sparkling Dust, Dress My Craft Rainbow Glitter, Dress My Craft Microfine GlitterClay : Sakura Air Dry ClayMold : Plaid Trinkets - Used to make the heart, bow, bagInks : Archival Ink Coffee, Distress Inks Mowed Lawn, Distress Inks Peeled Paint, Tattered Rose, Abandoned CoralMedia : Finnabair White Texture Crackle PasteDie Cutting Machine : Sizzix Big Shot MachineStamping Accessory : MISTILinking to theAll Sorts Challenge in my garden, DL Art July Challenge , Word Art WednesdayCraftyHazelnut's Pattern Paper Challenge , Pixie's Snippets Playground