 |
| Interactive Slider Card |
I love interactive books and cards and this particular tutorial is for a super simple easy to make interactive mechanism which can be used in cards,scrapbooks or even a school chart like we have done .
 |
| Kinetic slider card |
The pic I have used to illustrate the sliding mechanism in this interactive card is of our Lhasa-apso
Snowy who is sitting majestically on the bed posing for the photo!
Yesterday my 7 year old had to take a chart on "
time measuring devices" to her school.
 |
| Clocks school project |
She had to write interesting facts for each type of clock and we made
interactive sliders below each clock picture to pack in all the extra information and still keep the chart "clean"!!
 |
| Clock Interactive school project |
It was fun reading up about various crazy types of clocks [ Have you heard of an
incense clock or a calibrated
candle clock?!!]
 |
| Interactive school project |
Rather than type out the "facts' like we had done in the
Festivals of India school project this time my kiddo
proudly used her own cutie handwriting on all her hidden sliders!
 |
| Clock school project |
As the center focus of her school chart we made an
interactive clock with moving hands using a split pin [brad]
 |
| Interactive clock |
We also made an interactive "
princess" swinging pendulum clock using a hidden brad
 |
| Interactive School chart |
How to make an easy Interactive Card
Each photo we used in the school chart has a
pull tab which when pulled slides out to reveal a
hidden message.
This slider mechanism is quite easy to make but I am posting lots of step by step photos so that it may benefit a "non crafter" too!!
 |
| Interactive card tutorial |
Materials required- Thick sturdy card stock [Indian readers- ask for Ivory sheets in stationary shops] - size depends on the size of your picture
- Scissors
- Double sided foam tape - the narrow 1 cm variety is the best for slider cards
- Glue
If you want to make a slider for photos ..paste the photo on card stock and create the
slider mechanism on the other side of the card.
 |
| Interactive card tutorial |
Stick double sided tape on
3 sides of the card leaving one side open for your slider
 |
| Interactive card tutorial |
Cut a card strip to
loosely fit within the area framed by the foam tape
 |
| Interactive card tutorial |
To make a
stopper mechanism for your slider strip stick squares of foam tape at the slider opening as shown above
 |
| Interactive card tutorial |
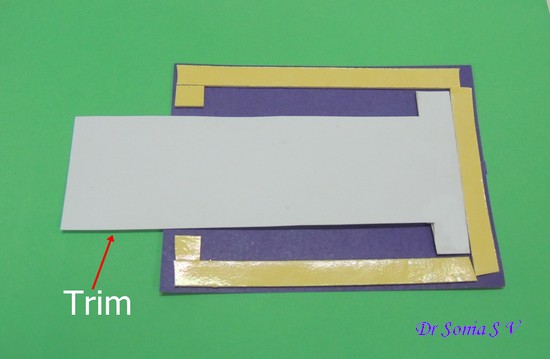
Cut off approximately
1/2 inch strips off your slider strip at the
top and
bottom edges as shown leaving around
an inch on one side to get a
T shaped slider |
| Interactive card tutorial |
Test if your slider moves freely by sliding it in and out of the
foam tape framed card.
 |
| Easy Interactive Card Tutorial |
The T stopper of the slider strip bears the maximum wear and tear in this type of slider card so it needs to be strengthened.To do this fold and stick as shown above
 |
| Easy Interactive Card Tutorial |
Your
slider mechanism is ready. You can
trim excess lengths of your slider strip at the region where you will pull it.
Keep the T slider strip within the foam framed area and
Peel off the paper from the foam tape,taking care the T slider doesnt stick to the tape.
Stick to a base card or a sturdy chart to make your fun kinetic card.
 |
| Kinetic card tutorial |
Of all the types of clocks ,my daughter was terribly fascinated by the water clock also called the Clepsydra and wanted me to make a 3 D model but we compromised by making an interactive water clock!The water clock also works on a sliding mechanism.On pulling the slider strip the shiny holographic water empties from the container!! |
| Slider card |
I modified the basic slider card tutorial explained above to make this interactive water clock!
I hope this interactive card tutorial comes in handy to add a bit of fun in card making ,scrapbooking or to jazz up any type of presentation at school,college or office!


Nenhum comentário:
Postar um comentário