 |
| House Shaped Box Tutorial |
This House Shaped Box is my Guest DT project for
BGC [my
cascading card came top at
BGC and I was invited to be Guest DT ].I designed the box with a detachable roof which can be snugly fitted back atop the house shaped box
 |
| House Shaped Box Tutorial |
I am always anxious when I have to do a DT project and tend to fall back on what I love to do [which is
recycling,and punchcraft]. I recycled this cardboard chocolates carton to make the house shaped box!
 |
| House Shaped Box Tutorial |
I used die cuts, glitter and flowers on the roof lid and base of my house shaped box.
 |
| House Shaped Box Tutorial |
I made the tiny daisies using a medium daisy punch and punched out tiny circles from glittery foam for the flower centers.]Here is the link to another type of
punchcraft daisy tutorial]I wanted the flowers to jut at an angle so quilled some bells shaped stems and used regular white glue to stick it to the walls of my house shaped box.
 |
| House Shaped Box Tutorial |
The pale pink balls are
thermocol balls![so cheap and such fun to craft with ] The cute little doll is a ten rupee find from the local market.I die cut butterflies from glittery foam using my big shot ; and hand cut a door for the house box!
 |
| House Shaped Box |
Added more punchcraft flowers with quilled stems on the other side of the house shaped box.
 |
| House Shaped Box |
The little windows were die cut from corrugated card using scallop square dies.This angle shows the back of our house shaped box.
 |
| House Shaped Box |
The tiny punchcraft daisies are also made from pearlised paper so they shimmer on the roof of the house box !
House Shaped Box tutorialThis is a recycling craft and recycling an old box is the easiest way to make the house shaped box as you already have a sturdy box with you and not much scoring and measuring is involved!
Materials required
- Box to recycle
- Craft knife and scissors
- Glue
- Scale and pen/pencil
- Cardboard piece or sturdy card stock for the roof [my roof is a recycled shaving set carton!]
On your box, mark and
draw out a house.Decide how you would like your final house to look.Draw a horizontal line.Decide how high you want the roof to be and mark at the center as shown in the 2nd pic.Draw diagonals to meet this central point from the horizontal.This easy technique gives a symmetrical house shape
 |
| House shaped box tutorial |
Cut along the box corner till the horizontal mark and then cut out the house shape marked earlier as shown in the box tutorial.
 |
| House shaped box tutorial |
Cut on the side as shown in the first picture. Mark out the house shape on the back side of the box as earlier and complete cutting out your house shaped box
 |
| House shaped box tutorial |
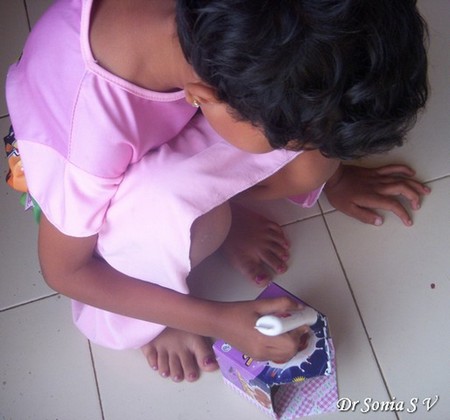
If you are lucky enough to have a little helper--this is the stage they can help while you grab a cup of coffee!Here is my little one helping to glue pattern paper on our house box.
 |
| House shaped box tutorial |
I wanted a roof which was detachable and yet snugly fit to serve as a lid for the house box.To make the roof take a sturdy card [mine is hubby's recycled shaver box cover] and place it over the house box
 |
| House shaped box tutorial |
Bend it over to create a roof.Mark and cut off extra lengths of your roof. Marking is easier if you invert the box as shown in the picture of the box making tutorial.
 |
| House shaped box tutorial |
To add a lid on the roof mark out the
triangular upper part of your house base on a thick piece of card. I have recycled Itsy Bitsy's embossing folder card for it [ yeah I am crazy and hoard and recycle all pretty papers including the packaging of my craft supplies!]
 |
| House shaped box tutorial |
Cut out the triangle as shown. Snip off wedges from the corners as in the 2nd photo. Bend back the 2 flaps which will we stuck on the roof of your house box
 |
| House shaped box tutorial |
Place it on the outer and top part of your house as shown and apply glue on the tabs as shown in the photo of the box tutorial.
 |
| House shaped box tutorial |
The photo below is the aerial view to help you understand better this step of making the roof lid of the house box.
 |
| House shaped box tutorial |
Firmly press down your roof on the glue tabs of the triangle as shown in the photo of the box tutorial.
 |
| House shaped box tutorial |
Remove the roof and press the tabs well from the inside as shown below in the photo of the box tutorial.
 |
| House shaped box tutorial |
In the similar fashion make the triangular lid on the other side. Take your time and fiddle a bit in this step as the placement of these triangular pieces determines how snugly your roof lid fits your house box.
 |
| House shaped box tutorial |
Once the framework of the roof is made you can decorate it as you wish. I added some die cut and embossed pearlised card over the roof base and added die cut butterflies and punchcraft floors to jazz up the roof of my house shaped box.
 |
| House Shaped Box |
I made my lid to fit snugly so that it does not fall of easily. If you find your lid is loose, you could add a latch of velcro or ribbon on the lid of the house box.
 |
| House Shaped Box |
I hope you enjoyed yet another recycling project. Do tell me what you think.
Supplies: Big shot,Scallop and butterfly Dies, Embossing folder, pearlised paper ,card stock, glitter foam all from Itsy Bitsy. Doll- Raja Market Bangalore
Linking to
Snehal's ChallengeEdited: This House shaped box came top 3 at Snehal's Box Challenge!
This project was featured at
Craft Gossip- Recycled Crafts


Nenhum comentário:
Postar um comentário