 |
| Handmade Stationary Holder and matching Box |
Hi friends sharing a special handmade gift idea to make for that special someone whom you are certain will appreciate the value of a handmade gift and all the love you put into making it!
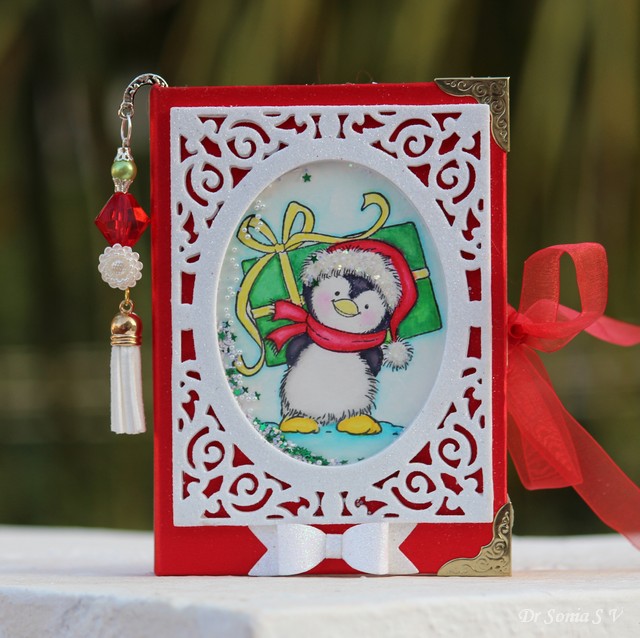 |
| Handmade Shaker Book |
On first glance it looks like a book with a beautiful dangling bookmark ! Well it is a special type of book-- it has a satin fabric cover and lining, a sturdy chipboard base, engraved metal corners, an organza ribbon fastening and a dimensional shimmery glitter foam shaker with the most adorable penguin!!
 |
| Notebook Holder and Side Pocket |
On opening the book, one side has a pocket with space for tags , mini cards and a gift card if you wish.I made a simple ribbon rose bookmark on a jumbo paper clip to match the rest of the project. Added a festive red bell on the mini tag saying "handmade with love" !
 |
| Handmade Stationary Set |
The pocket on the other side has a magnetic flap which on opening reveals 2 mini notebooks- one with a ribbon rose and the other with a glittery "Rudolf the red nosed reindeer"!!
 |
| Stationary Set |
The little pen was dressed up with a festive ribbon band and fits snugly inside the pen holder made with matching ribbon. The metal bookmark was handmade using beads and a tassel in festive colors!
 |
| Handmade Gift Box |
The stationary set needed a fitting box so made a matching gift box featuring the same adorable Penguin colored using Staedtler watercolor pencils and Zig Watercolor Brush Pens . The cute penguin rests on gorgeous satin cloth and is framed in a shimmery glitter foam dimensional frame.
If you are curious how I made it just breeze through the detailed Tutorial below and bookmark/pin it for later use ....or jump right down to the comments and tell me how you like this project!
Making the "Book style Cover"The construction of the cover is very similar to making a mini album cover with a few tricks you can use to up the
oomph factor!!!
Materials:
- Chipboard
- Cover and Inner Lining: Use high quality paper/ leather /kraft tex[see this post : Kraft-tex Projects], fabric. I used paper lined satin sheets which added to the glamour coefficient!
- Good quality glue : I used Scotch adhesive spray which was super quick ,didnt wrap the fabric paper and gave fantastic adhesion.
- Ribbon
 |
| Book Cover Tutorial |
4.5 x 6 inch with a 3/4 or 1 inch spine is a good size for the stationary set cover. For this you need the following chipboard pieces:Two 4.5 x 6 inch and one 1x6 inch.
The outer satin paper should be large enough to give at least a 3/4 inch margin all around when you line up the chipboard pieces as shown above. Use at least 8 x 11.5 inch [A4 ] cover fabric/paper. The inner lining should be at least 6 x 10 inches.
 |
| Stationary Holder Tutorial |
Stick the chipboard pieces one by one onto the back of your fabric cover. Since I used Scotch spray adhesive this was a super quick step for me. Use a spare chipboard piece and position it between your big chipboard pieces and spine piece while you glue so that you get a gap that will allow your book to close and open easily.
 |
| Stationary Holder Tutorial |
After gluing close and open the book so that the fabric stretches nicely.
Snip off wedges at the 4 corner and glue these onto the chipboards
 |
| Stationary Holder Tutorial |
To ensure that you don't lose the flexibility of your book cover use a chipboard piece and use it to sort of score over the glued fabric in the gaps on either side of the spine.
 |
| Stationary Holder Tutorial |
Now place your ribbon in the center of the book cover and glue on the 6 x 10 inner lining fabric. You may trim the 6 x 10 piece before gluing it on if it is overhanging over the sides.
 |
| Stationary Holder Tutorial |
While gluing the inner lining...again use a chipboard piece to score along the gaps on either side of the spine to ensure a good adhesion.
Now your cover is ready...you can use this to make a mini album , a folding photo-frame[ see
Photoframe Tutorial ] or a stationary holder like in this project.
How to make a Mini Notebook Holder.
This holder can house 2 thin notebooks measuring 3 x 4 inches
Materials :
- Card stock - 11 1/4 x 5 1/4 inch
- Pattern paper
- Adhesive- use liquid glue
- Magnets
 |
| Notebook Holder Tutorial |
Take a 11 1/4 x 5 1/4 inch cardstock and score at 3 , 3 1/2, 8 and 8 1/2 inches on the long side
 |
| Notebook Holder Tutorial |
Turn it and score 1/2 , 1, 4 1/4 and 4 3/4.
 |
| Notebook Holder Tutorial |
This is the pictorial representation and the blue shaded region is the part you can snip off before folding and gluing.
 |
| Notebook Holder Tutorial |
The shorter 2 3/4 inch side will form the top closure flap and if you want you can cut a fancy edge to it. I used a Crealies On the edge die to cut both the card stock and pattern paper for the flap.
 |
| Notebook Holder Tutorial |
 |
| Notebook Holder Tutorial |
Snip off the side 1 inch borders on the 2 3/4 and 1/2 part....refer to the graphic shaded in blue if you get confused.
 |
| Notebook Holder Tutorial |
Cut in 1 inch at the lower part as shown and snip off parts as shown in the graphic.Optionally cut wedges/ round off the edges to allow easy gluing.
 |
| Notebook Holder Tutorial |
Fold along the score lines as shown and you can see your note holder taking shape.
 |
| Notebook Holder Tutorial |
Add a small magnet on the inside of your top flap and cover with pattern paper for a neat finish.
 |
| Notebook Holder Tutorial |
Optionally line the inside of your note holder with pattern paper.
Apply glue on the tiny squares shown below first
 |
| Notebook Holder Tutorial |
Fold up the lower flap and stick it onto to tiny squares and then glue over the side flaps as shown below.
 |
| Notebook Holder Tutorial |
Lastly stick on another magnet on the lower flap adjusting the position to perfectly line with the magnet on the upper flap.
 |
| Notebook Holder Tutorial |
Cover the magnet with pattern paper.
How to make the Pen Holder |
| Notebook Holder Tutorial |
Form a loop of ribbon to snugly fit around and pen ...apply glue and hold with a paper clip till it dries! Stick the ribbon tail under your notebook holder while you stick it to the book cover.
 |
| Stationary Holder Tutorial |
I hope you liked this Tutorial and project!
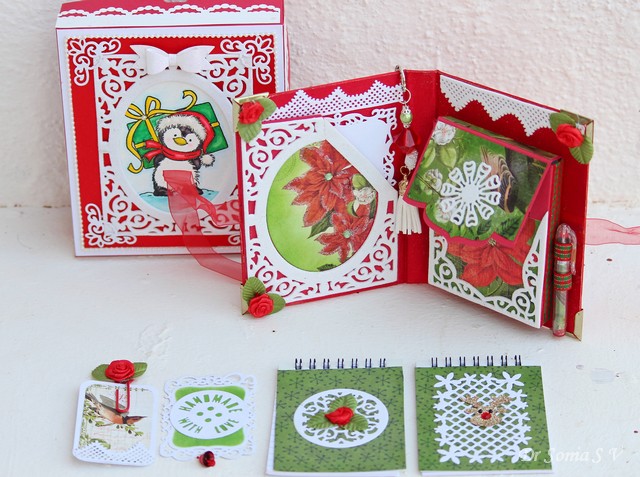 |
| Handmade Stationary Gift Set |
This project is my DT post for
Cuttlebug Mania Challenge where the theme is "Anything Christmas with a die /embossing folder"
I have used a ton of dies in this project and here is the list of Supplies
: Dies : Spellbinders Card Creator A2 Filigree Delight, Spellbinders Decorative Labels 8 ,Spellbinders swirl bliss pocket[center of notebook],Spellbinders Curved Matting Basics B,Spellbinders Majestic Labels 25,Spellbinders Lace Hearts [lacy corners on box],Tonic Mixed Scalloped and Straight Cut Oval Layering Die Set,Crealies On the Edge 33 ,Crealies Duo Dies 47,Magnolia Doohickeys Vintage Box Lacing Coffee,Wild Rose Studio Floral Frame,Xcut Handmade With Love
Papers : Graphic 45 Time to flourish ,Debbie Mumm Harvest and Holiday
Stamp: Wild Rose Studio Penguin with Present
Nenhum comentário:
Postar um comentário